Oracle GoldenGate 12.3 Microservices Architecture just came out. This is a separate build, and in contrary to previous architecture (called now Classic Architecture) has distinct installation binaries and completely different directory structure after installation. Processes are run from different binaries and the whole configuration is also completely different. This article is a complete tutorial which shows how to install and configure OGG 12.3 Microservices Architecture (MA) to replicate a table from Oracle 12.2 to Oracle 11.2.
Before you start the configuration, please note, that the OGG 12.3 MA is brand new . You might run into many different issues while using it. Very often strange warnings come out in the log.
In this tutorial I am using:
- Host hostdb with Linux (x86_64)
- Oracle 12.2.0.1 (database O122ASIA – source for replication)
- Oracle 11.2.0.4 (database O112AFRO – target for replication)
- Host hostogg with Linux (x86_64)
- OGG 12.3 MA for Oracle 11 + Client Oracle 11.2.0.4
- OGG 12.3 MA for Oracle 12 + Client Oracle 12.2.0.1
I am not describing the installation & configuration process for databases. The databases are installed and configured using absolutely minimum options that are required to run them. I have tried to run the replication with Oracle 12.1.0.2 as the source database but it seems not to work at all (details below). In my lab Integrated Extract fails. But with Oracle database 12.2.0.1 it works fine.
This is a picture of how Microservices Architecture works:
Let’s start.
1. Software installation
Oracle provides separate binaries for Oracle 12 and Oracle 11 databases. When the replication is involving both versions – then both binaries are to be installed. Also both versions of Oracle client are required in such configuration. The following paths have been chosen for the installation.
- /opt/db/11.2.0.4 – database client
- /opt/db/12.2.0.1 – database client
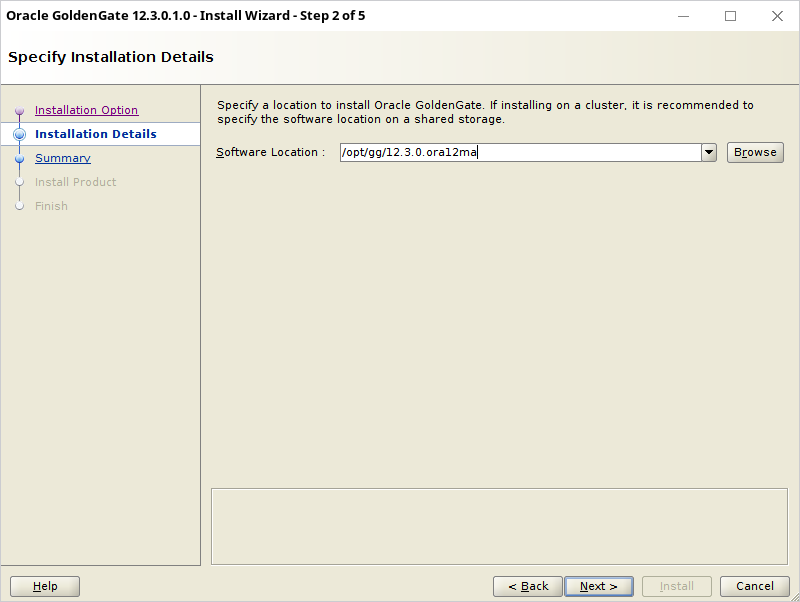
- /opt/gg/12.3.0.ora11ma – OGG 12.3 MA for Oracle 11
- /opt/gg/12.3.0.ora12ma – OGG 12.3 MA for Oracle 12
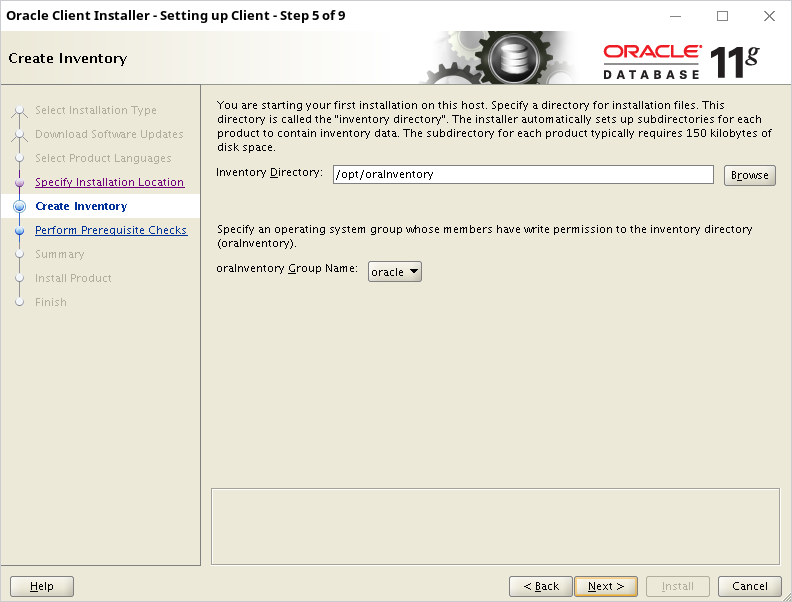
- /opt/oraInventory – Oracle Inventory
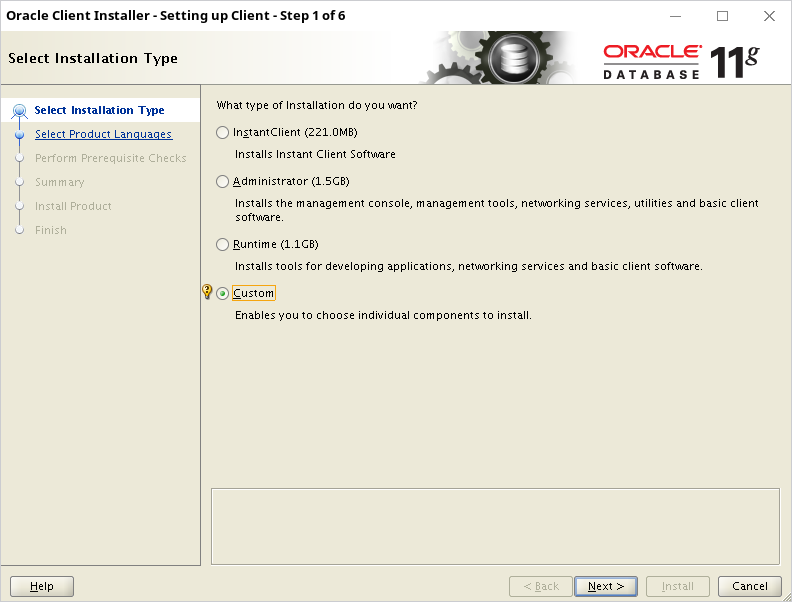
1.1. Oracle database 11.2.0.4 client installation
Unpack the ZIP archive and run the installer: ./runInstaller
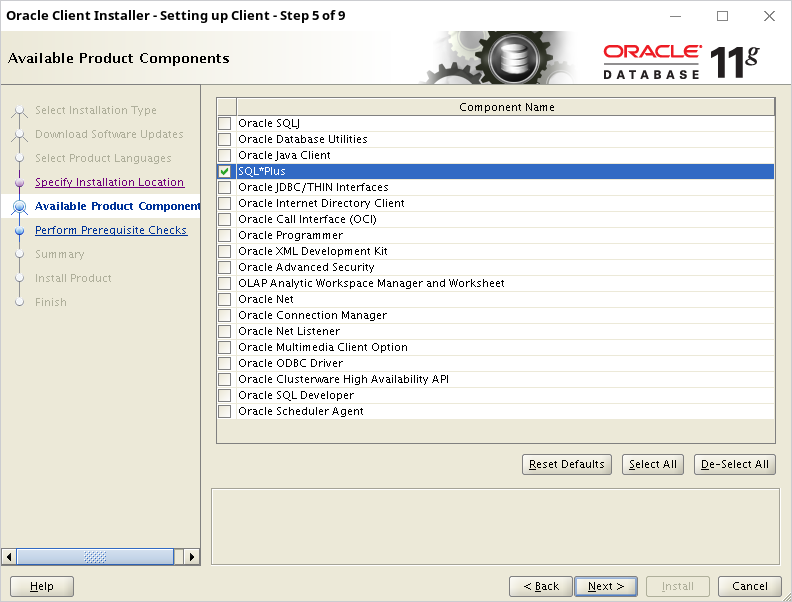
Choose Custom option to install only the required components.
Skip the updates:

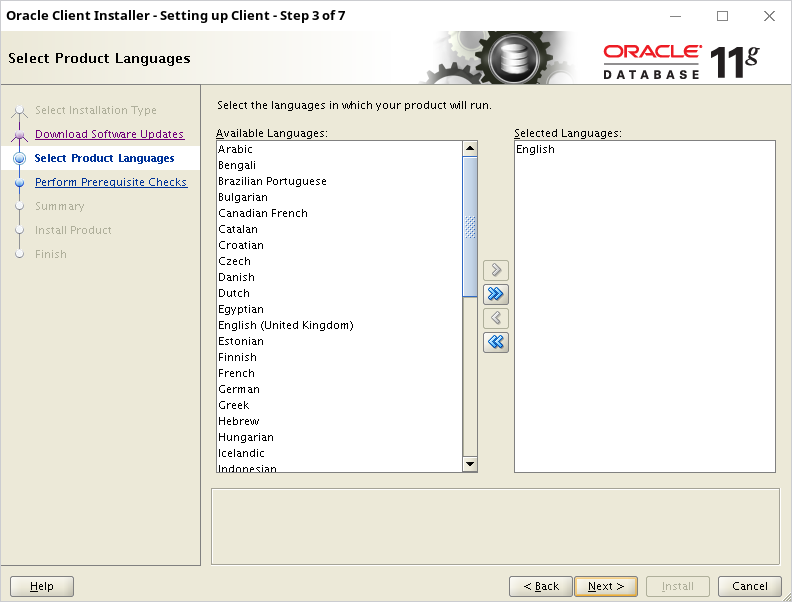
Choose English as the only installed language:
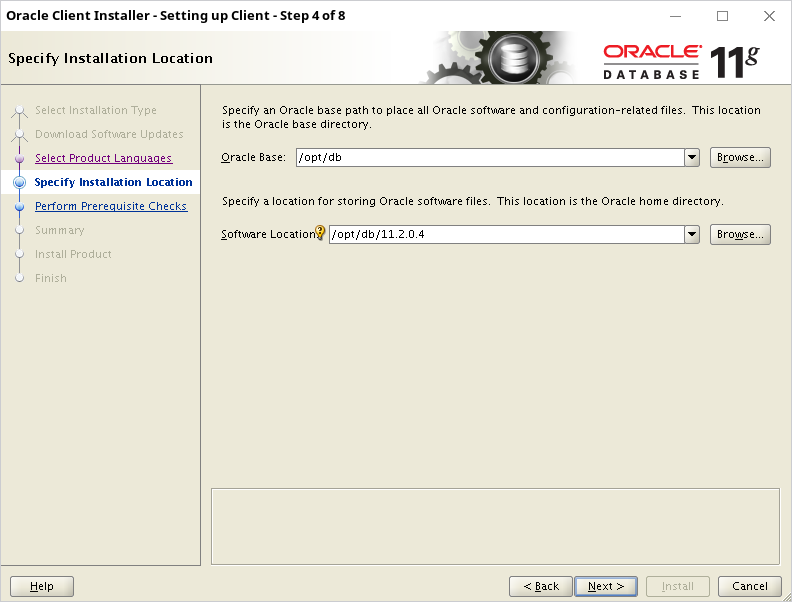
Set Oracle Base to /opt/db and database location to /opt/db/11.2.0.4
Since this is the first installation – Inventory location needs to be set.
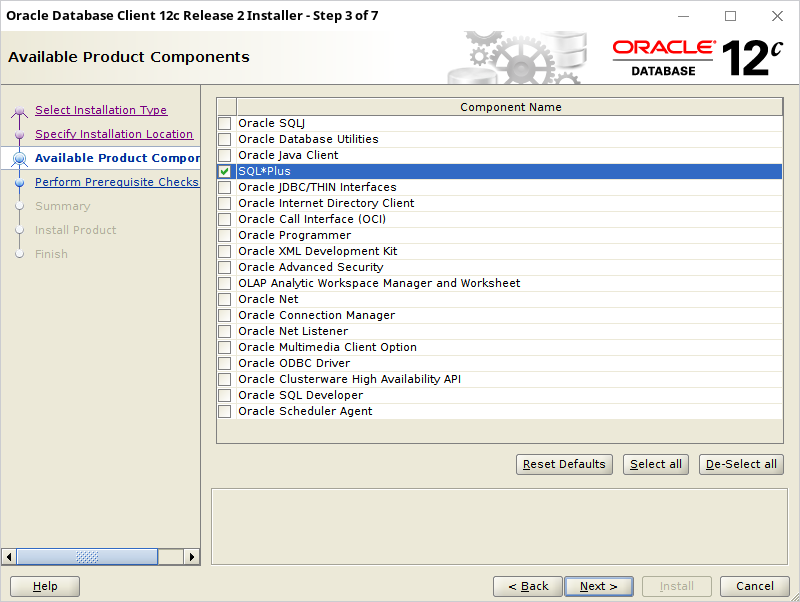
It’s just enough to install SQL*Plus. Other packages are (probably) not required by OGG. But SQL*Plus is useful to test the configuration.
The documentation is not clear about which options are actually required.
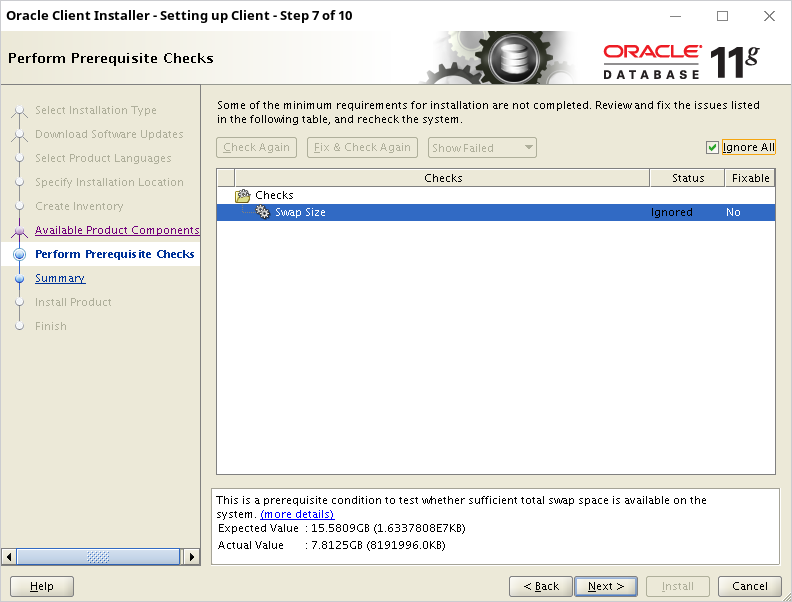
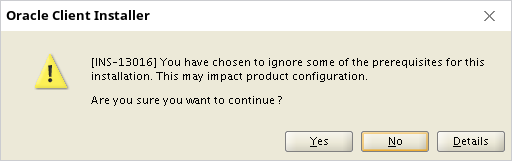
Skip the swap requirement check – in my lab I have 16GB of RAM but only 8GB swap. That should not be a problem for Oracle client:
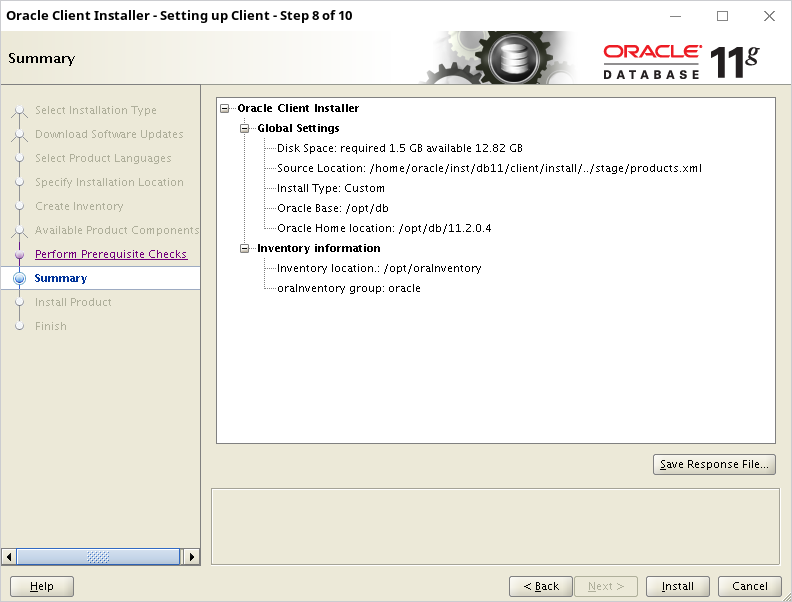
Summary:
The installer requires to run /opt/oraInventory/orainstRoot.sh using root user:
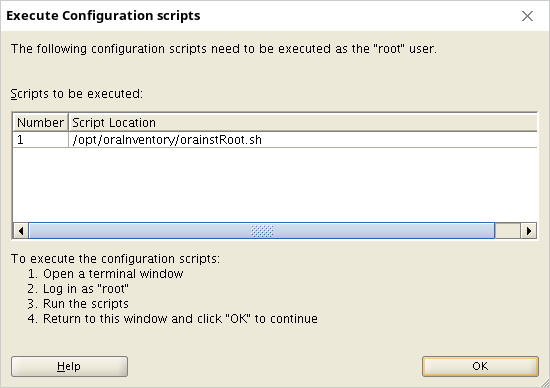
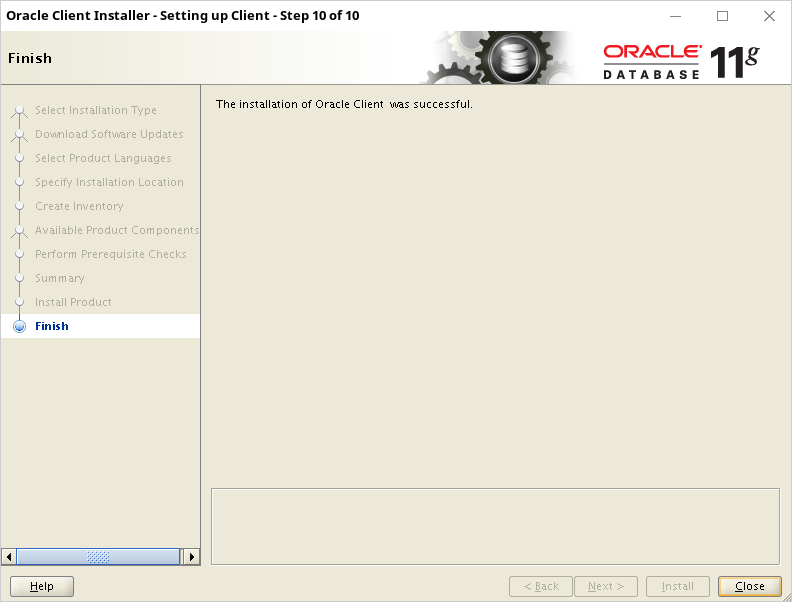
The script adds some files to /etc folder and sets the owner to oracle user. The end screen should show that installation is complete:
In the end you can (optionally) run also root.sh script using the root account to install shell environment scripts in /usr/local/bin:
[root@demawend 11.2.0.4]# cd /opt/db/11.2.0.4
[root@demawend 11.2.0.4]# ./root.sh
Performing root user operation for Oracle 11g

The following environment variables are set as:
 ORACLE_OWNER= oracle
 ORACLE_HOME= /opt/db/11.2.0.4

Enter the full pathname of the local bin directory: [/usr/local/bin]:
 Copying dbhome to /usr/local/bin ...
 Copying oraenv to /usr/local/bin ...
 Copying coraenv to /usr/local/bin ...


Creating /etc/oratab file...
Entries will be added to the /etc/oratab file as needed by
Database Configuration Assistant when a database is created
Finished running generic part of root script.
Now product-specific root actions will be performed
Create /opt/db/11.2.0.4/network/admin/tnsnames.ora file with the following content:
O112AFRO =
  (DESCRIPTION =
    (ADDRESS = (PROTOCOL = TCP)(HOST = hostdb)(PORT = 4380))
      (CONNECT_DATA =
      (SERVICE_NAME = O112AFRO.ORADOMAIN)
    )
 )
The service name should match the service name of your Oracle database O112AFRO.
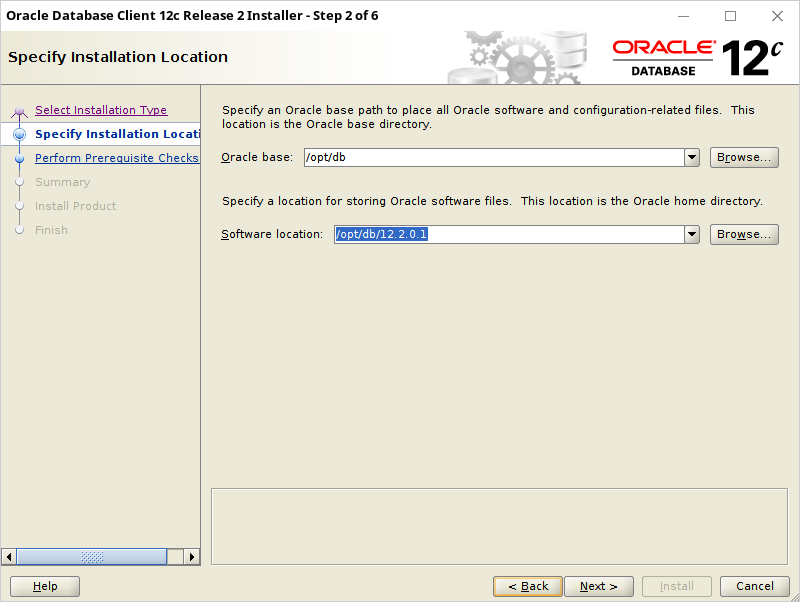
1.2. Oracle database 12.2.0.1 client installation
Unpack the ZIP archive and run the installer: ./runInstaller and choose Custom option to install only the required components.
Set the oracle base to /opt/db and software location to /opt/db/12.2.0.1
Choose the same options like for Oracle 11g:
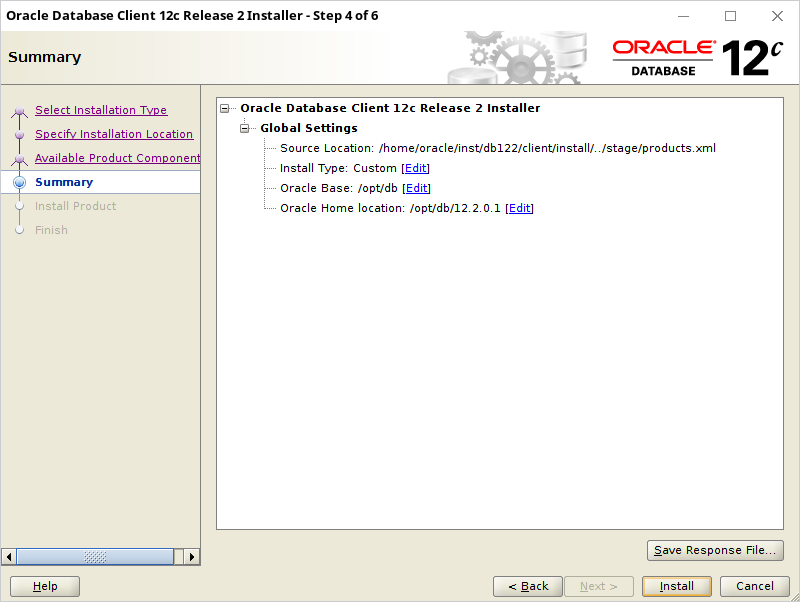
Summary:
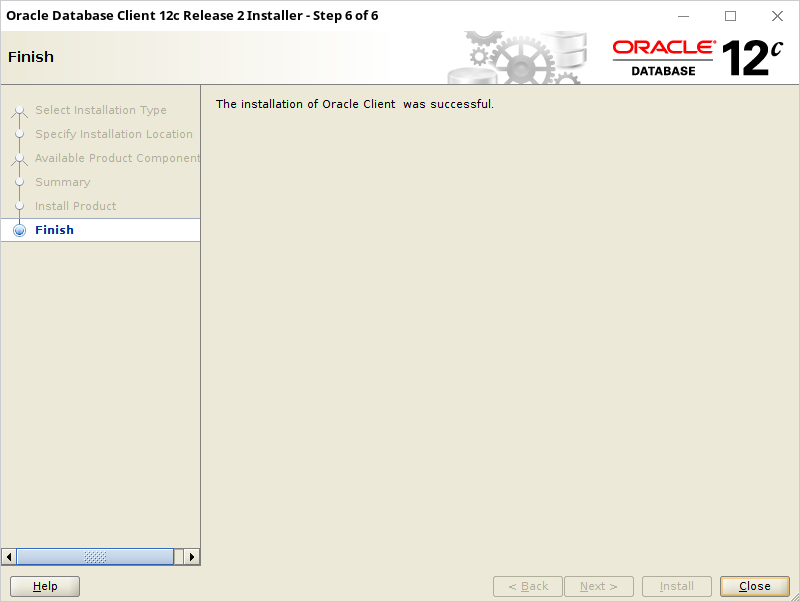
The installation is complete:
Create /opt/db/12.2.0.1/network/admin/tnsnames.ora file with the following content:
O122ASIA =
  (DESCRIPTION =
    (ADDRESS = (PROTOCOL = TCP)(HOST = hostdb)(PORT = 4490))
      (CONNECT_DATA =
      (SERVICE_NAME = O122ASIA.ORADOMAIN)
    )
 )
The service name should match the service name of your Oracle database O122ASIA.
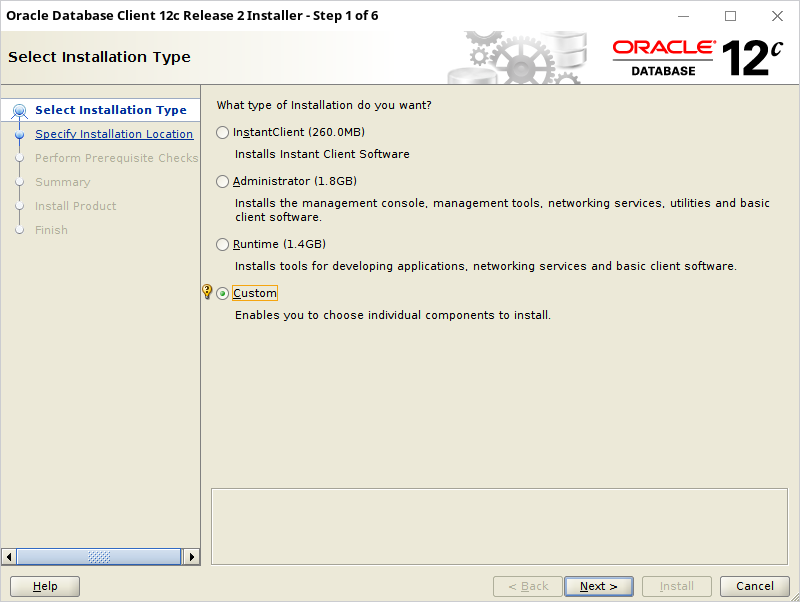
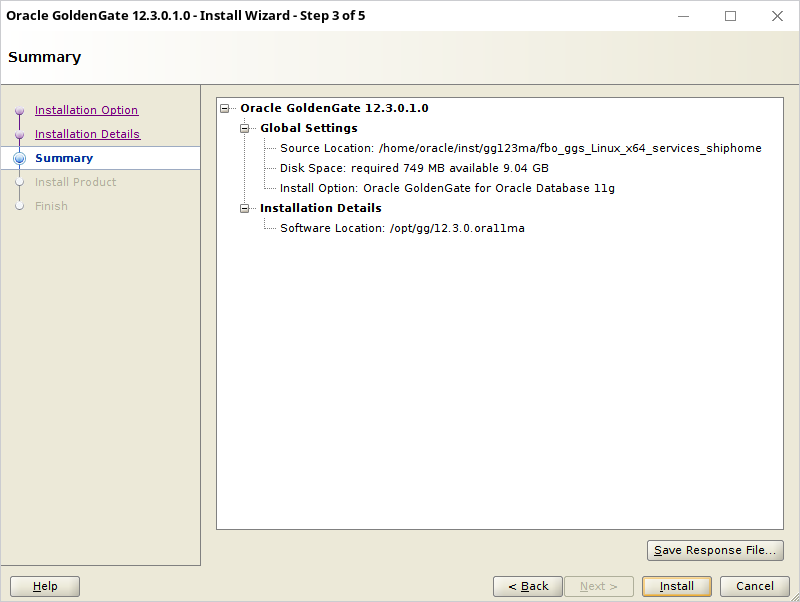
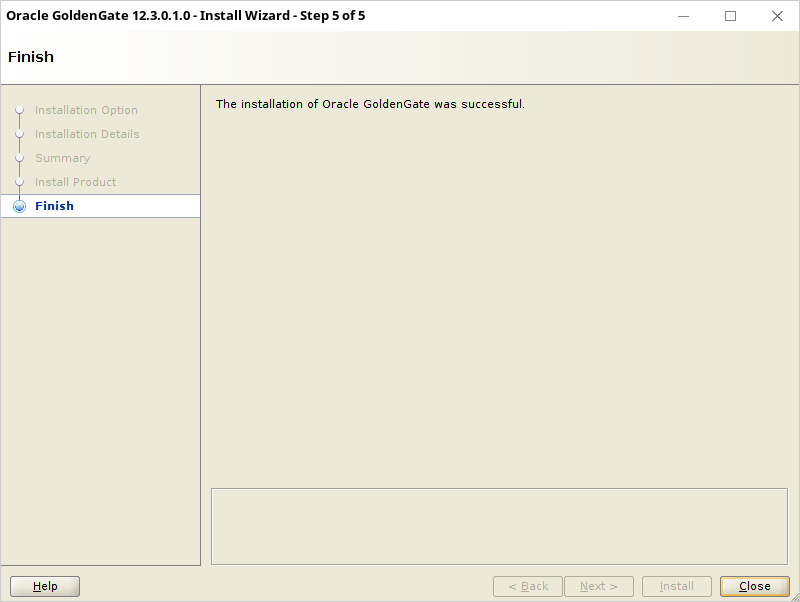
1.3. Oracle GoldenGate 12.3 Microservices Architecture for Oracle 11g installation
Unpack the ZIP archive and run the installer: ./runInstaller and choose version for Oracle 11g.
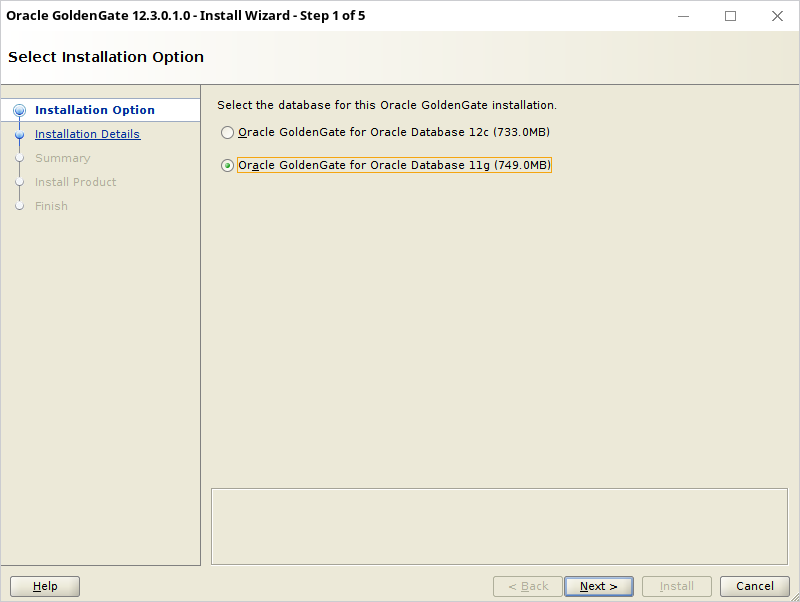
The target directory is: /opt/gg/12.3.0.ora11ma

Summary:
The installation is complete:
1.4. Oracle GoldenGate 12.3 Microservices Architecture for Oracle 12c installation
Unpack the ZIP archive and run the installer: ./runInstaller and choose version for Oracle 12c.
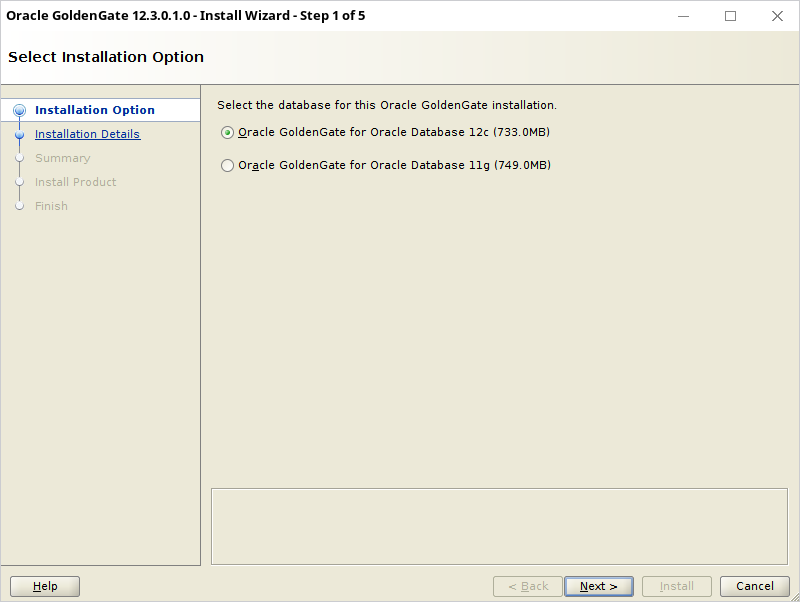
The target directory is: /opt/gg/12.3.0.ora12ma
Summary:

The installation is complete:

2. Instance configuration
The goal is to create one Service Manager and two Deployments for OGG: one for Oracle 11g and one for Oracle 12c.
First create the directories:
mkdir /opt/gg/OGGSM
mkdir /opt/gg/G123AFRO
mkdir /opt/gg/G123ASIA
The purpose for the directories is:
- /opt/gg/OGGSM – Service Manager (one for the whole replication)
- /opt/gg/G123ASIA – deployment for Oracle 12c
- /opt/gg/G123AFRO – deployment for Oracle 11g
Those locations are separate from binaries. One binary can handle multiple deployments.
2.1. Service Manager + Deployment for Oracle 12c
Next run the instance configuration assistant (oggca):
export ORACLE_HOME=/opt/db/12.2.0.1
export LD_LIBRARY_PATH=${ORACLE_HOME}/lib:${LD_LIBRARY_PATH}
export OGG_HOME=/opt/gg/12.3.0.ora12ma
export TNS_HOME=/opt/db/12.2.0.1/network/admin
cd ${OGG_HOME}/bin
./oggca.sh
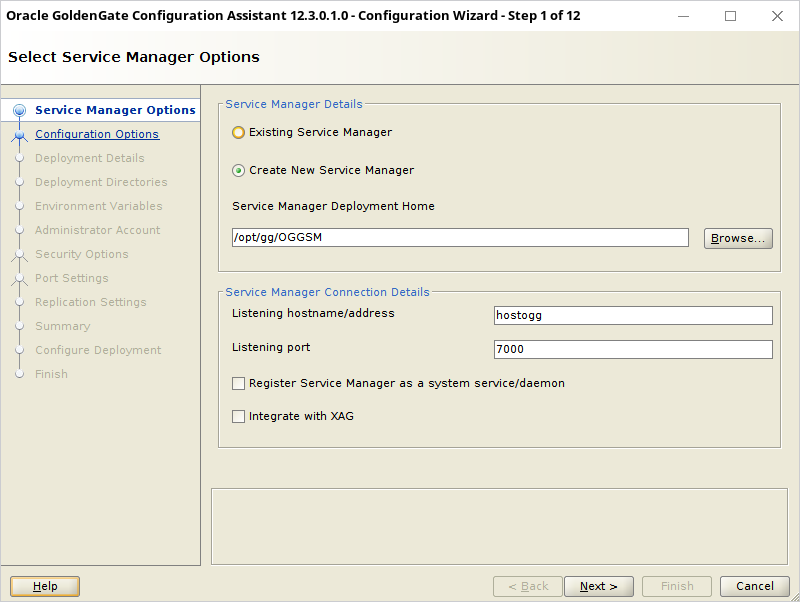
Select Create new Service Manager in the location /opt/gg/OGGSM,set the host to hostogg and port to 7000:
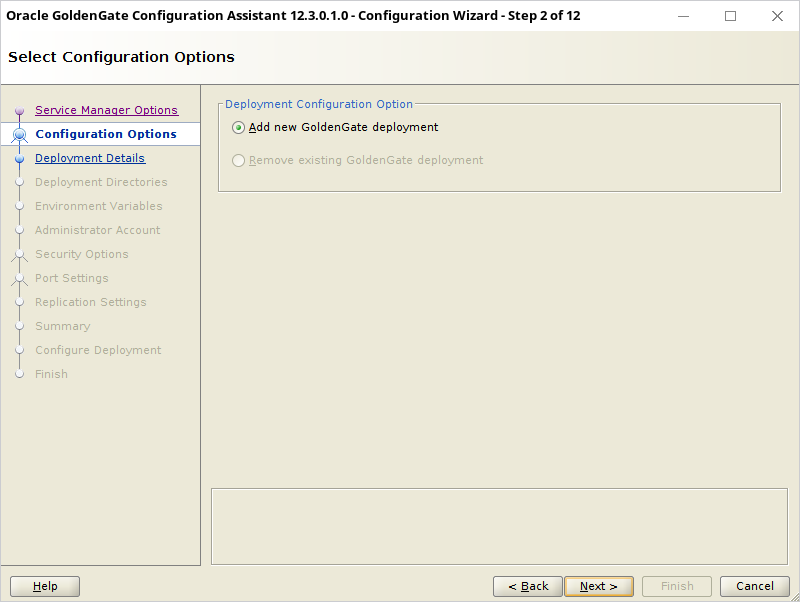
It is not possible to create just a Service Manager without a Deployment, so choose the only available option:
The name of the Deployment is G123ASIA (handing database O122ASIA). It will use the OGG 12.3 for Oracle 12c binaries. Multiple deployment can share the software location, because no files being used by the Deployment are placed together. Finally Oracle has divided the OGG binaries from the configuration, traces and logs files. Thanks Oracle for this feature!
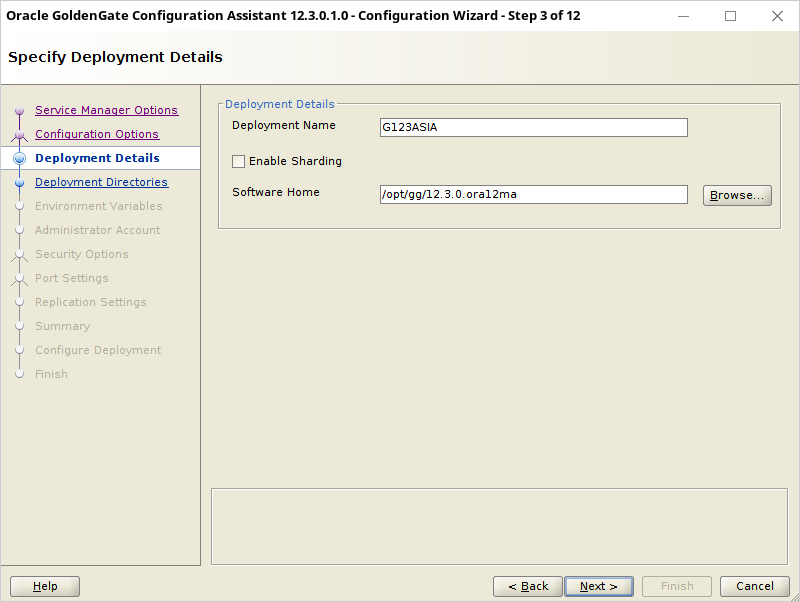
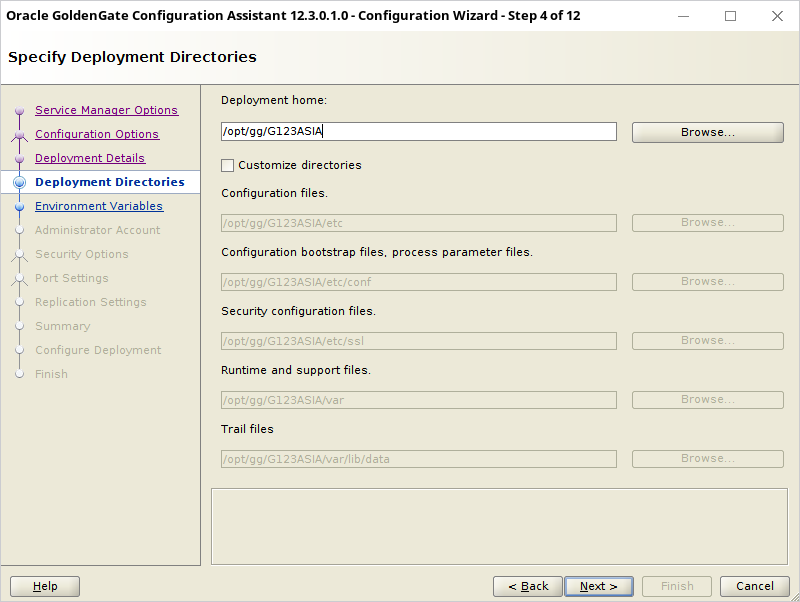
Set the location of the deployment to /opt/gg/G123ASIA. It’s better to leave all the subdirectories with default values:
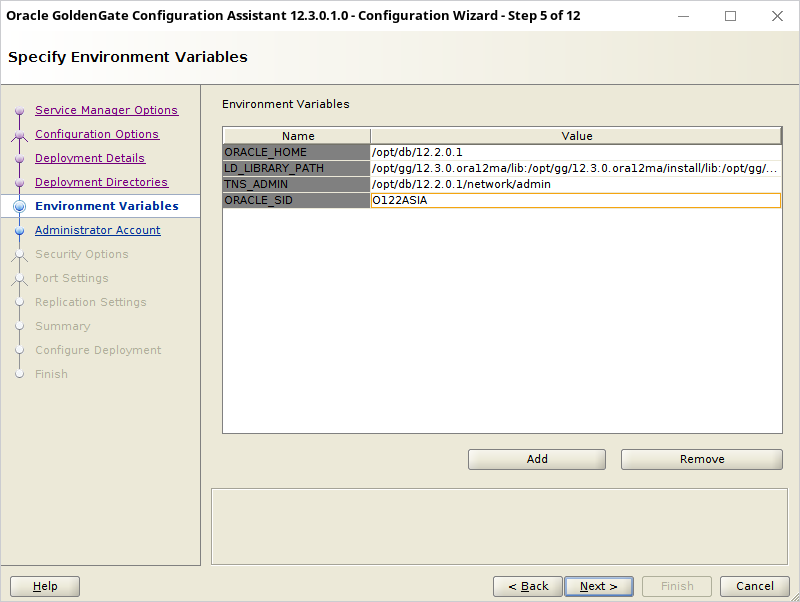
Set the environment variables to:
- Oracle Home: /opt/db/12.2.0.1
- LD_LIBRARY_PATH: /opt/gg/12.3.0.ora12ma/lib:/opt/gg/12.3.0.ora12ma/install/lib:/opt/gg/12.3.0.ora12ma/oui/lib/linux64:/opt/db/12.2.0.1/lib:
- TNS_ADMIN: /opt/db/12.2.0.1/network/admin
- ORACLE_SID: O122ASIA
Omitting some of the variables may (like TNS_ADMIN) will cause strange errors. OGG has no default for that variable.
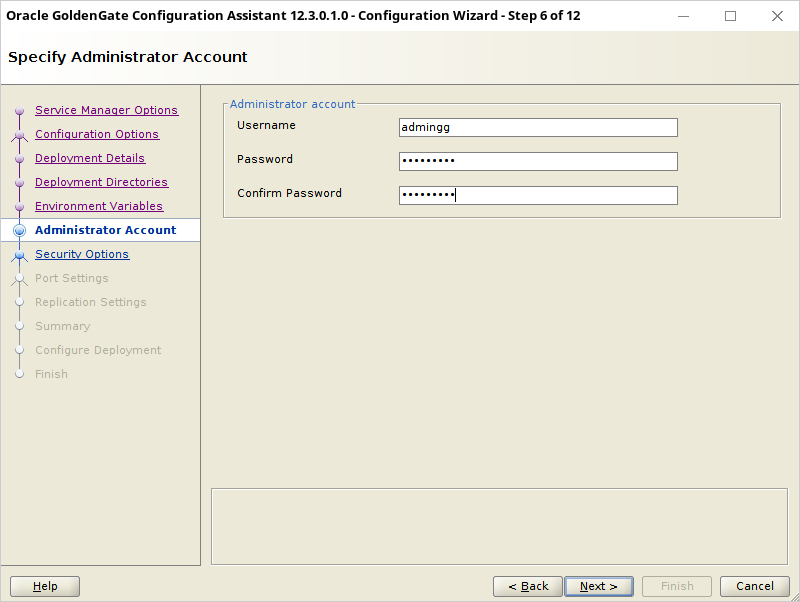
The account will be used for both – connecting to the Service Manager and the Deployment. It will also be used later to create a second Deployment and attach to the Service Manager. Set the user will be admingg and password adminPWD1.
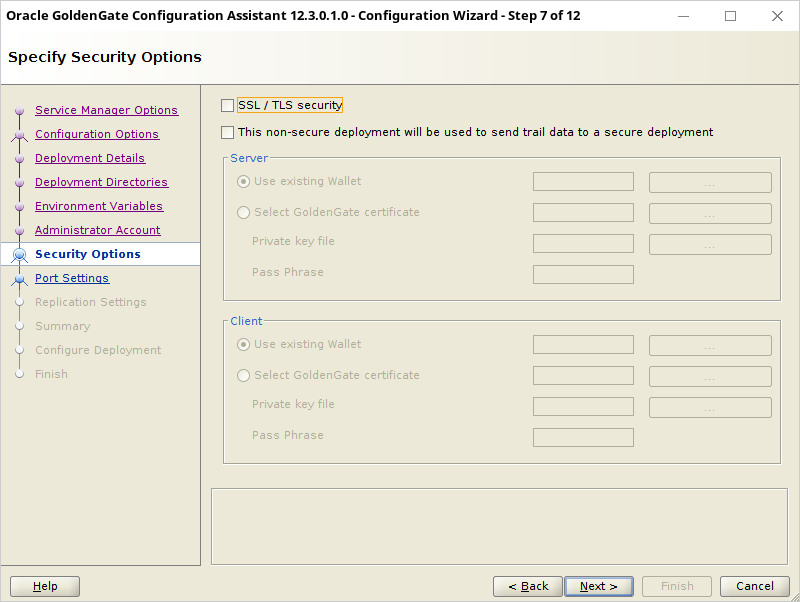
To make this configuration easier – uncheck all encryption options:
Since all servers from the deployment are independent – they need 3 listener ports. Set the port values to:
- Administration Server Port: 7001
- Distribution Server Port: 7002
- Receiver Server Port: 7003

The last parameter is the default user that will be used in GLOBALS with ggschema parameter: choose the default GGADMIN user:
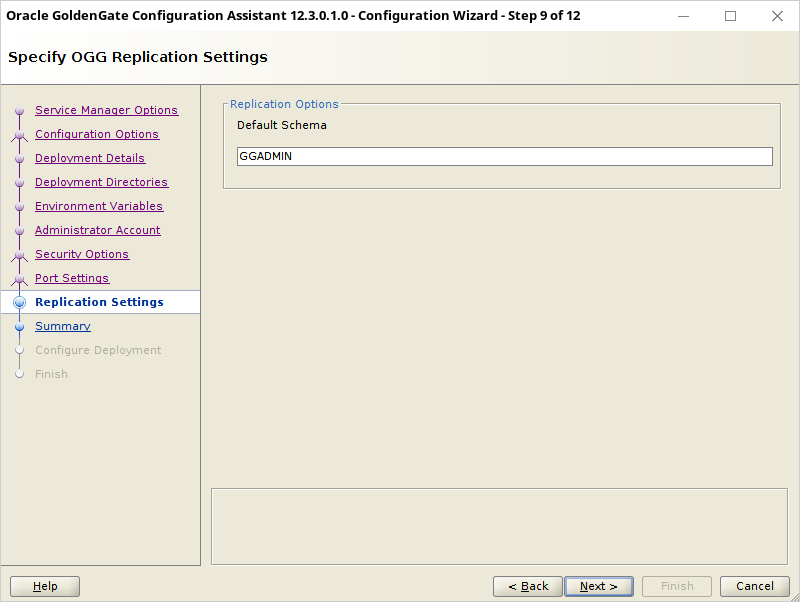
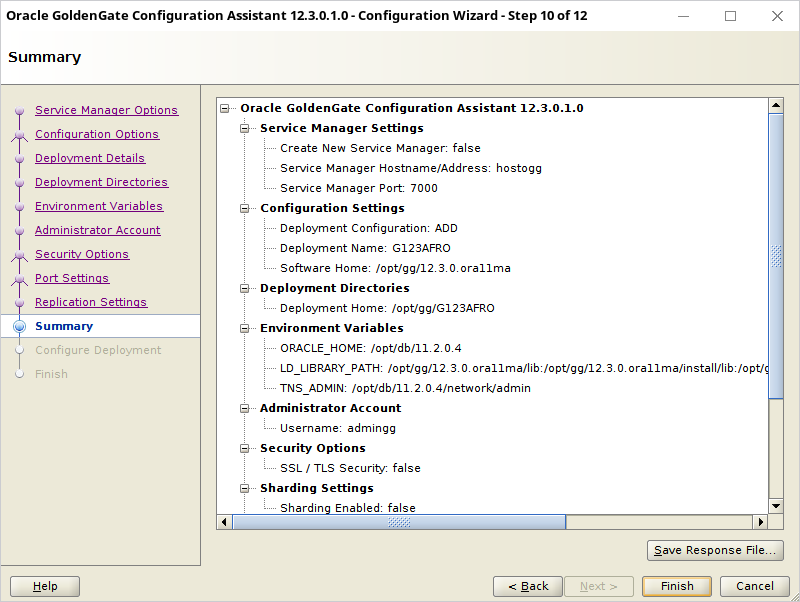
Summary of the installation parameters:
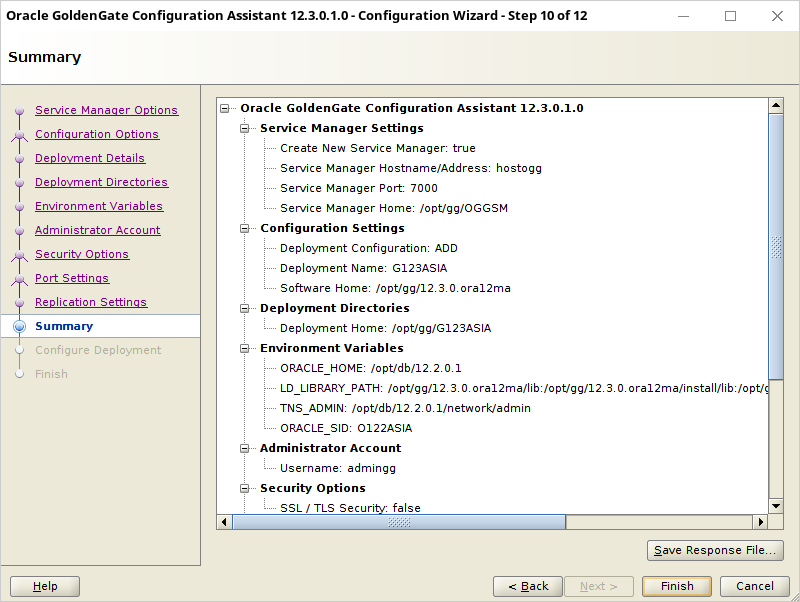
Installation is very quick. Just needs a few files to be created. After it is complete:

After the installer is finished – the Service Manager and the Deployment servers are running. The processes are up and the network listener is active.
bash-4.4$ ps -ef | grep /opt/gg
oracle 29676 2986 0 21:08 pts/4 00:00:00 /opt/gg/12.3.0.ora12ma/bin/ServiceManager --config /opt/gg/OGGSM/var/temp/ServiceManager-config.dat --force
oracle 29765 29676 0 21:08 ? 00:00:00 /opt/gg/12.3.0.ora12ma/bin/adminsrvr --config /opt/gg/OGGSM/var/temp/G123ASIA-adminsrvr-config.dat --force --quiet --deployment G123ASIA
oracle 29767 29676 0 21:08 ? 00:00:00 /opt/gg/12.3.0.ora12ma/bin/distsrvr --config /opt/gg/OGGSM/var/temp/G123ASIA-distsrvr-config.dat --force --quiet --deployment G123ASIA
oracle 29769 29676 0 21:08 ? 00:00:00 /opt/gg/12.3.0.ora12ma/bin/recvsrvr --config /opt/gg/OGGSM/var/temp/G123ASIA-recvsrvr-config.dat --force --quiet --deployment G123ASIA
oracle 30924 24205 0 21:09 pts/4 00:00:00 grep /opt/gg

bash-4.4$ netstat -apn | grep LISTEN | grep tcp | grep 70
(Not all processes could be identified, non-owned process info
 will not be shown, you would have to be root to see it all.)
tcp 0 0 192.168.0.30:4470 0.0.0.0:* LISTEN -
tcp 0 0 0.0.0.0:7000 0.0.0.0:* LISTEN 29676/ServiceManage
tcp 0 0 0.0.0.0:7001 0.0.0.0:* LISTEN 29765/adminsrvr
tcp 0 0 0.0.0.0:7002 0.0.0.0:* LISTEN 29767/distsrvr
tcp 0 0 0.0.0.0:7003 0.0.0.0:* LISTEN 29769/recvsrvr
What is worth notice – even though the configuration assistant asked for the host name – the processes are listening on 0.0.0.0 interface, not the interface specified for the installer.
[Update, 2017.11.23]
As Tanyi noticed in the comment – you might need to start the Service Manager manually. This could happen if the host is rebooted. To start it run:
cd /opt/gg/OGGSM/bin
./startSM.sh
2.2. Deployment for Oracle 11g
Leave the console with environment settings for Oracle 12c open and run a second console that would launch the Configuration Assistant for Oracle 11g:
export ORACLE_HOME=/opt/db/11.2.0.4
export LD_LIBRARY_PATH=${ORACLE_HOME}/lib:${LD_LIBRARY_PATH}
export OGG_HOME=/opt/gg/12.3.0.ora11ma
export TNS_HOME=/opt/db/11.2.0.4/network/admin
cd ${OGG_HOME}/bin
./oggca.sh
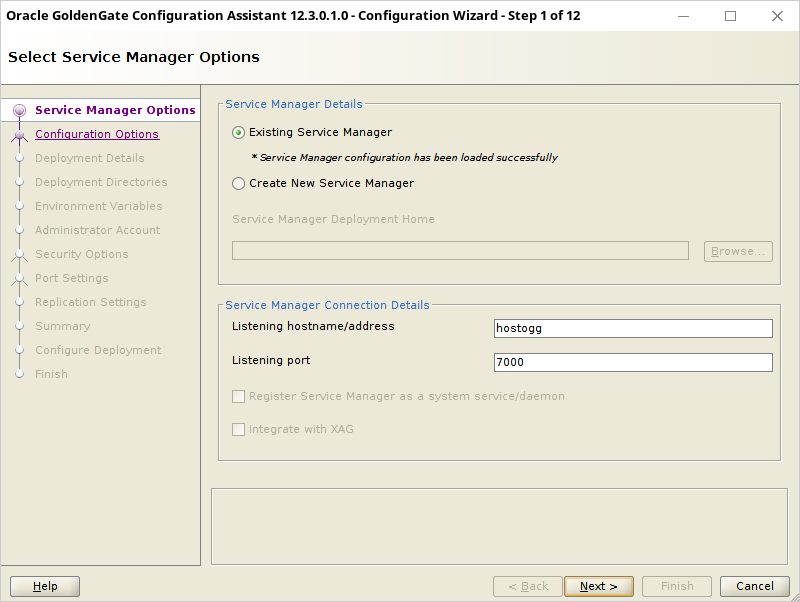
Choose Existing Service Manager, host hostogg and port 7000:
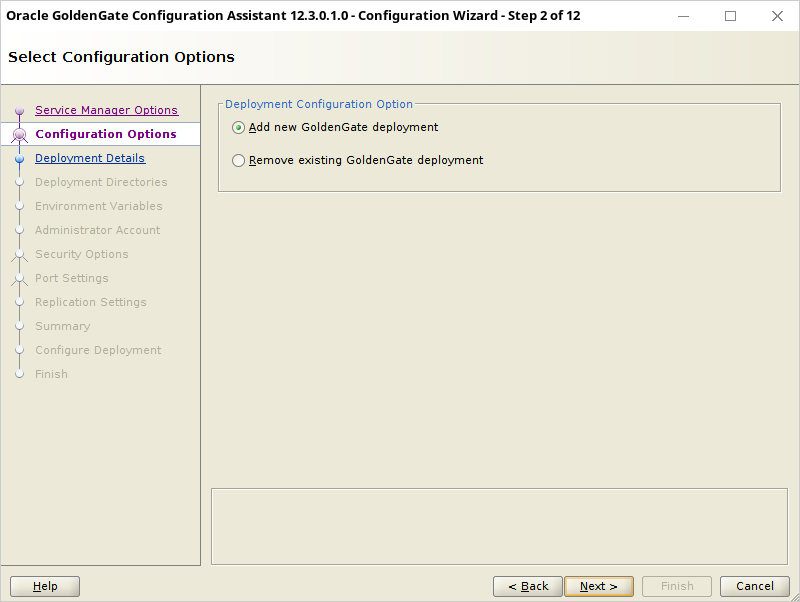
Choose to Add a new GoldenGate deployment.
Set the name of the OGG 11g deployment to G123AFRO and the location of binaries to /opt/gg/12.3.0.ora11ma:
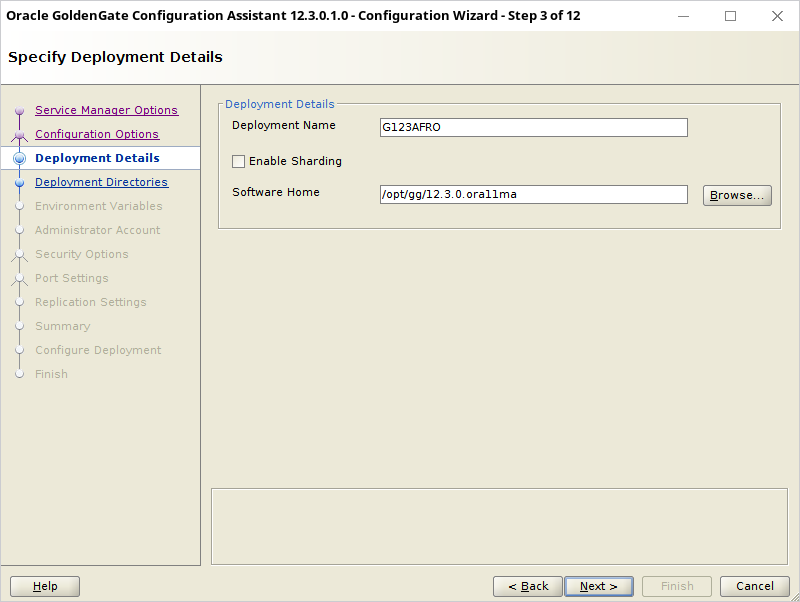
Set the location of the deployment to /opt/gg/G123AFRO. Leave all the subdirectories with default values:

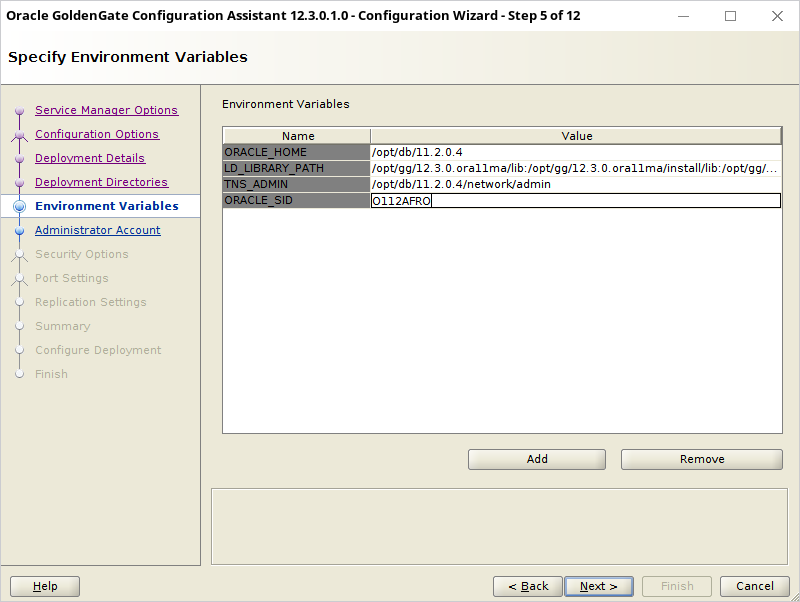
Set the environment variables to (don’t forget TNS_ADMIN!):
- Oracle Home: /opt/db/11.2.0.4
- LD_LIBRARY_PATH: /opt/gg/12.3.0.ora11ma/lib:/opt/gg/12.3.0.ora11ma/install/lib:/opt/gg/12.3.0.ora11ma/oui/lib/linux64:/opt/db/11.2.0.4/lib:
- TNS_ADMIN: /opt/db/11.2.0.4/network/admin
- ORACLE_SID: O112AFRO
The configuration assistant asks for the user and password. Enter the credentials same as for previously created Service Manger. It might be confusing that the password has to be entered twice, since it is to be verified by the previously created instance. The verification of the password is performed at the end of the wizard and if the password is incorrect the whole process will fail (and has to be started from scratch):

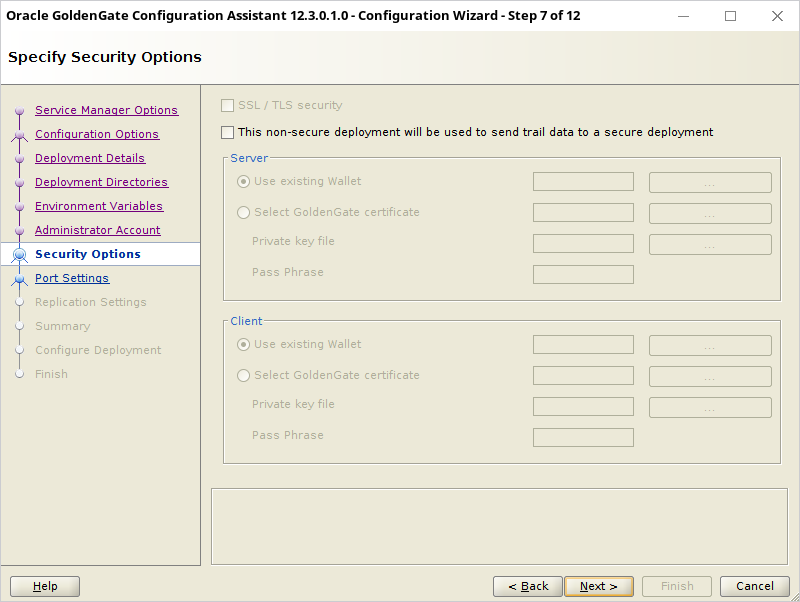
Unselect encryption:
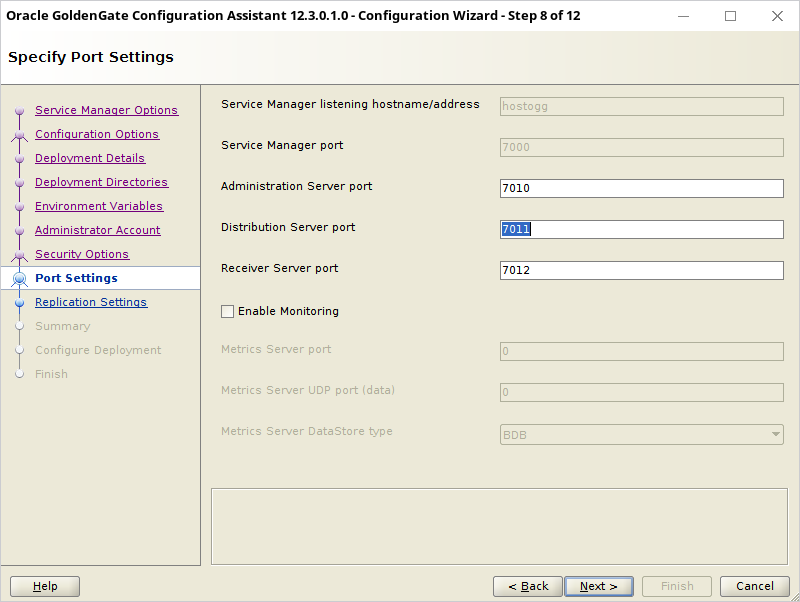
Set 3 ports to:
- Administration Server Port: 7010
- Distribution Server Port: 7011
- Receiver Server Port: 7012
Set the schema to GGADMIN:

A brief summary is:
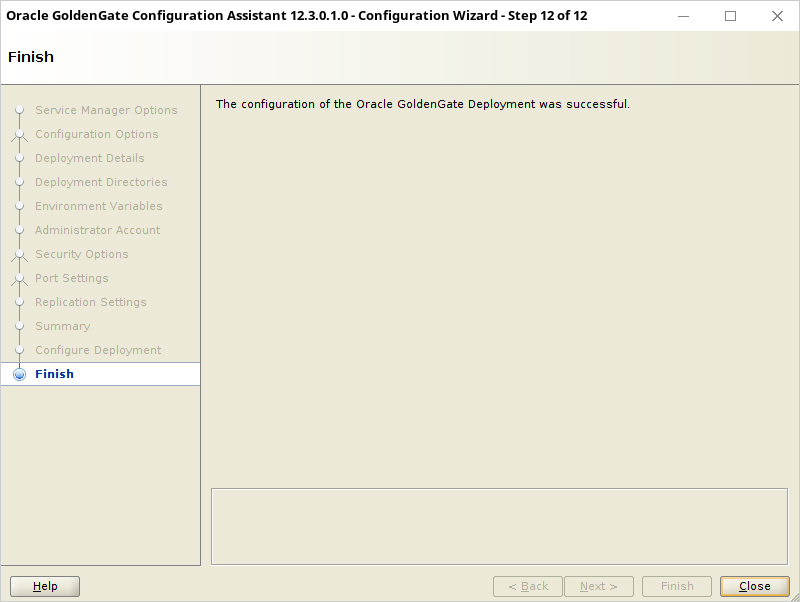
The setup is done:
The second Deployment is up and running, what can be verified with top & netstat:
bash-4.4$ netstat -apn | grep LISTEN | grep 70
(Not all processes could be identified, non-owned process info
 will not be shown, you would have to be root to see it all.)
tcp 0 0 0.0.0.0:7011 0.0.0.0:* LISTEN 21478/adminsrvr
tcp 0 0 0.0.0.0:7012 0.0.0.0:* LISTEN 21480/distsrvr
tcp 0 0 0.0.0.0:7013 0.0.0.0:* LISTEN 21482/recvsrvr
tcp 0 0 0.0.0.0:7000 0.0.0.0:* LISTEN 16211/ServiceManage
tcp 0 0 0.0.0.0:7001 0.0.0.0:* LISTEN 11700/adminsrvr
tcp 0 0 0.0.0.0:7002 0.0.0.0:* LISTEN 11702/distsrvr
tcp 0 0 0.0.0.0:7003 0.0.0.0:* LISTEN 11704/recvsrvr
unix 2 [ ACC ] STREAM LISTENING 29708 - /tmp/.ICE-unix/1363
unix 2 [ ACC ] STREAM LISTENING 29707 - @/tmp/.ICE-unix/1363

bash-4.4$ ps -ef | grep /opt/gg
oracle 11700 2986 0 05:41 ? 00:00:02 /opt/gg/12.3.0.ora12ma/bin/adminsrvr --config /opt/gg/OGGSM/var/temp/G123ASIA-adminsrvr-config.dat --force --quiet --deployment G123ASIA
oracle 11702 2986 0 05:41 ? 00:00:01 /opt/gg/12.3.0.ora12ma/bin/distsrvr --config /opt/gg/OGGSM/var/temp/G123ASIA-distsrvr-config.dat --force --quiet --deployment G123ASIA
oracle 11704 2986 0 05:41 ? 00:00:04 /opt/gg/12.3.0.ora12ma/bin/recvsrvr --config /opt/gg/OGGSM/var/temp/G123ASIA-recvsrvr-config.dat --force --quiet --deployment G123ASIA
oracle 16211 2986 0 05:49 pts/11 00:00:02 /opt/gg/12.3.0.ora12ma/bin/ServiceManager
oracle 21478 16211 0 05:57 ? 00:00:00 /opt/gg/12.3.0.ora11ma/bin/adminsrvr --config /opt/gg/OGGSM/var/temp/G123AFRO-adminsrvr-config.dat --force --quiet --deployment G123AFRO
oracle 21480 16211 0 05:57 ? 00:00:00 /opt/gg/12.3.0.ora11ma/bin/distsrvr --config /opt/gg/OGGSM/var/temp/G123AFRO-distsrvr-config.dat --force --quiet --deployment G123AFRO
oracle 21482 16211 0 05:57 ? 00:00:00 /opt/gg/12.3.0.ora11ma/bin/recvsrvr --config /opt/gg/OGGSM/var/temp/G123AFRO-recvsrvr-config.dat --force --quiet --deployment G123AFRO
oracle 23202 14614 0 05:59 pts/11 00:00:00 grep /opt/gg
3.Database preparation
Below is a setup of minimal database parameters to run OGG. Do not use user account with DBA role since this is a very bad habit to use even for testing environments. Only the required rights should be granted.
3.1. Database O122ASIA set up
The database configuration script for Oracle 12c:
ALTER DATABASE ADD SUPPLEMENTAL LOG DATA;
ALTER DATABASE FORCE LOGGING;
ALTER SYSTEM SWITCH LOGFILE;
shutdown immediate
startup mount
alter database archivelog;
alter database open;
alter system set enable_goldengate_replication=true;
alter system set streams_pool_size = 1000m;

-- the rest does not require sys account:
CREATE TABLESPACE JAN DATAFILE SIZE 104857600 AUTOEXTEND ON NEXT 104857600 BLOCKSIZE 8192;
CREATE TABLESPACE GGADMIN DATAFILE SIZE 10485760 AUTOEXTEND ON NEXT 10485760 BLOCKSIZE 8192;

CREATE USER JAN IDENTIFIED BY janpwd DEFAULT TABLESPACE "JAN" TEMPORARY TABLESPACE "TEMP";
ALTER USER JAN QUOTA UNLIMITED ON JAN;
GRANT CONNECT TO JAN;
GRANT RESOURCE TO JAN;

CREATE USER GGADMIN IDENTIFIED BY ggpwd DEFAULT TABLESPACE "GGADMIN" TEMPORARY TABLESPACE "TEMP";
ALTER USER GGADMIN QUOTA UNLIMITED ON GGADMIN;
GRANT CONNECT TO GGADMIN;
GRANT RESOURCE TO GGADMIN;
GRANT ALTER ANY TABLE TO GGADMIN;
exec dbms_goldengate_auth.grant_admin_privilege('GGADMIN');

create table JAN.table1 (
  a numeric(10),
  b varchar2(20)
);
alter table JAN.table1 add constraint table1_pk primary key(a)
After the setup is done the ALTER ANY TABLE grant (required for ADD TRANDATA) can be revoked.
3.2. Database O112AFRO set up
Setup script for target database for Oracle 11g:
alter system set enable_goldengate_replication=true;
alter system set streams_pool_size = 1000m;

CREATE TABLESPACE JAN DATAFILE SIZE 104857600 AUTOEXTEND ON NEXT 104857600 BLOCKSIZE 8192;
CREATE TABLESPACE GGADMIN DATAFILE SIZE 10485760 AUTOEXTEND ON NEXT 10485760 BLOCKSIZE 8192;

CREATE USER JAN IDENTIFIED BY janpwd DEFAULT TABLESPACE "JAN" TEMPORARY TABLESPACE "TEMP";
ALTER USER JAN QUOTA UNLIMITED ON JAN;
GRANT CONNECT TO JAN;
GRANT RESOURCE TO JAN;

CREATE USER GGADMIN IDENTIFIED BY ggpwd DEFAULT TABLESPACE "GGADMIN" TEMPORARY TABLESPACE "TEMP";
ALTER USER GGADMIN QUOTA UNLIMITED ON GGADMIN;
GRANT CONNECT TO GGADMIN;
GRANT RESOURCE TO GGADMIN;
grant select on "_DBA_APPLY_PROGRESS" to ggadmin;
exec dbms_goldengate_auth.grant_admin_privilege('GGADMIN');
grant select any dictionary to GGADMIN;
alter system set streams_pool_size = 1000m;

create table JAN.table1 (
  a numeric(10),
  b varchar2(20)
);
alter table JAN.table1 add constraint table1_pk primary key(a);
grant insert, update, delete, select on JAN.table1 to GGADMIN;
Two of the grants are interesting:
grant select on "_DBA_APPLY_PROGRESS" to ggadmin;
grant select any dictionary to GGADMIN;
The grants are not mentioned by the documentation as being required. But without them the Replicat process will not start (details later).
4. Extract configuration
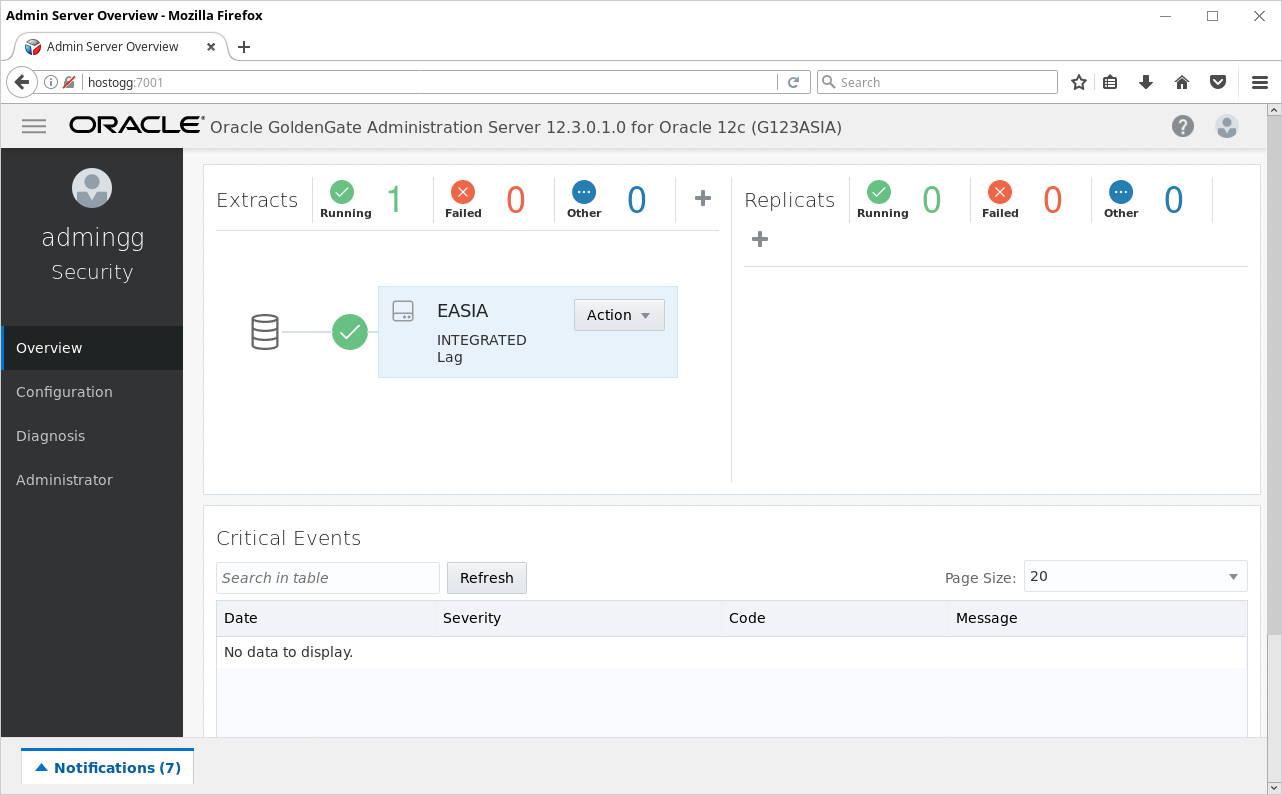
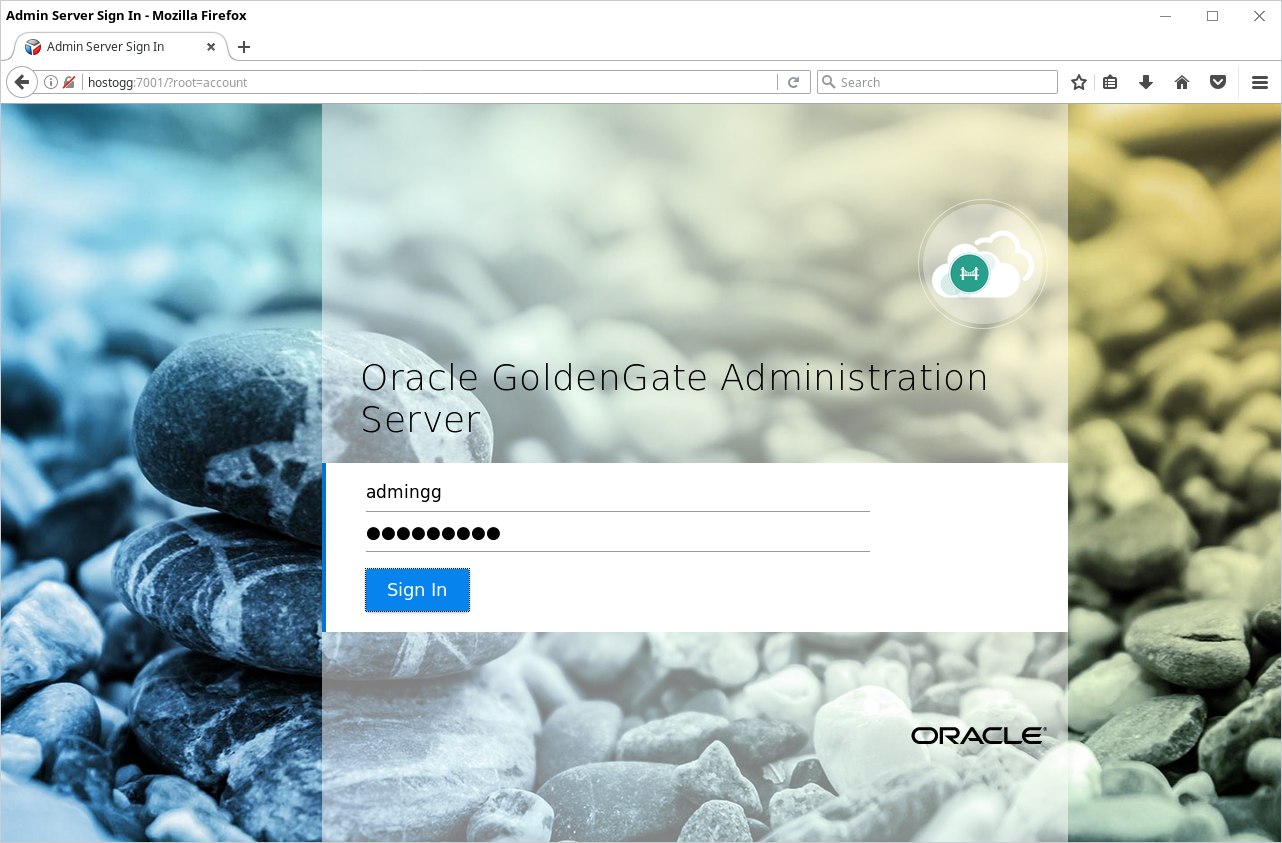
From now on the rest of the configuration can be done using the web interface. Open browser with url: http://hostogg:7001/ and login using admingg/adminPWD1 credentials:
Next click on the upper left corner and from the menu choose Configuration:
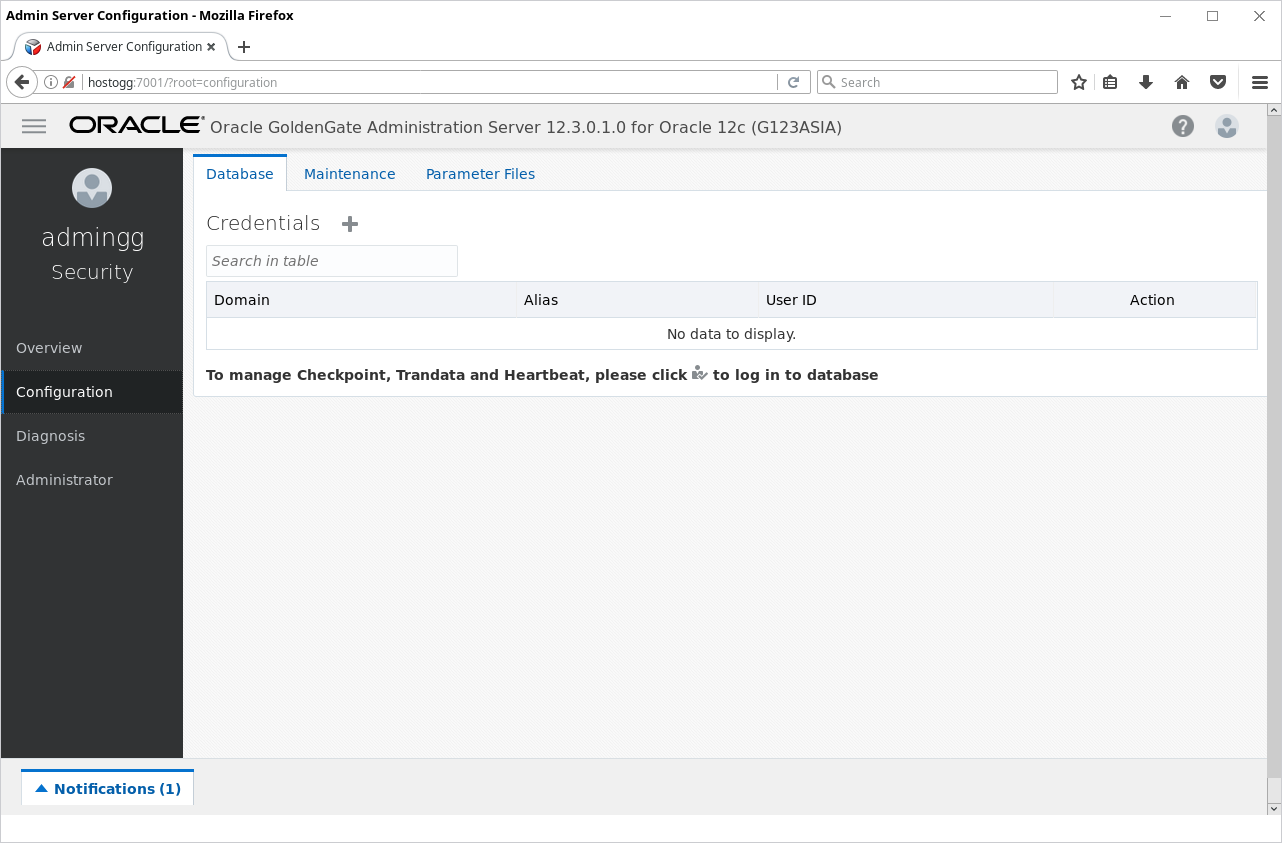
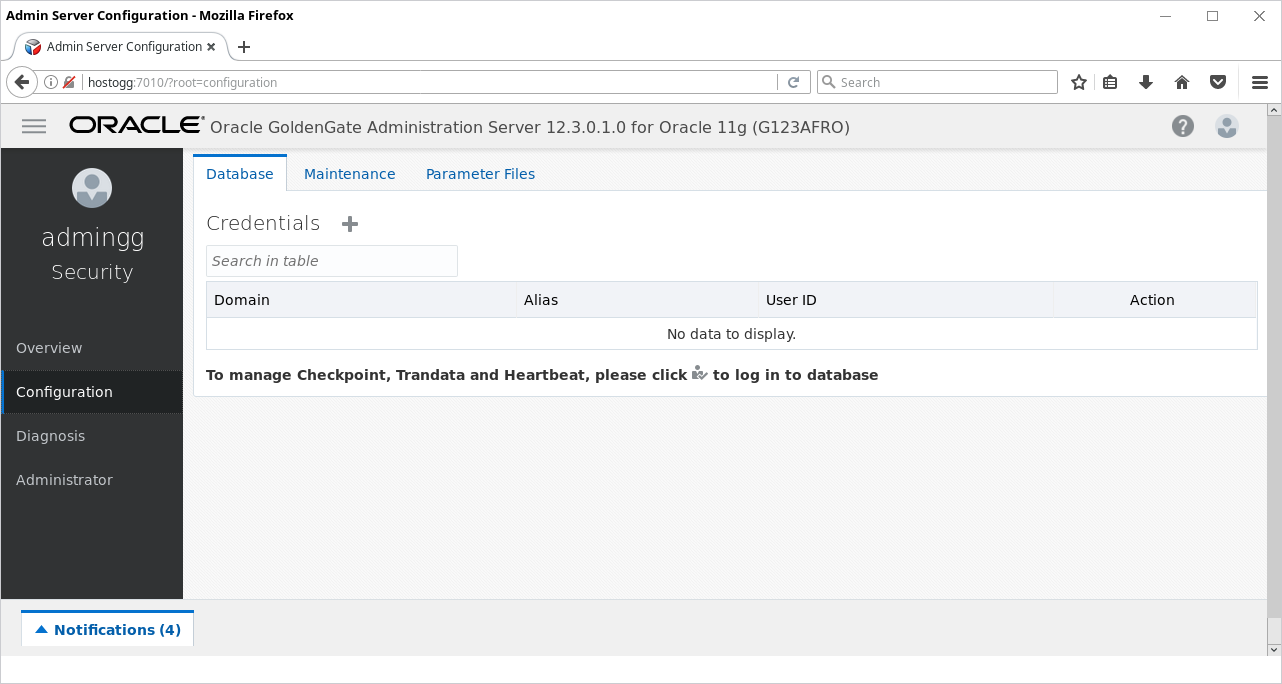
The credential store has to be created. Click on the (+) and enter the following data:
- Alias: GGADMIN_O122ASIA
- User ID: ggadmin@O122ASIA
- Password: ggpwd
Click Submit.
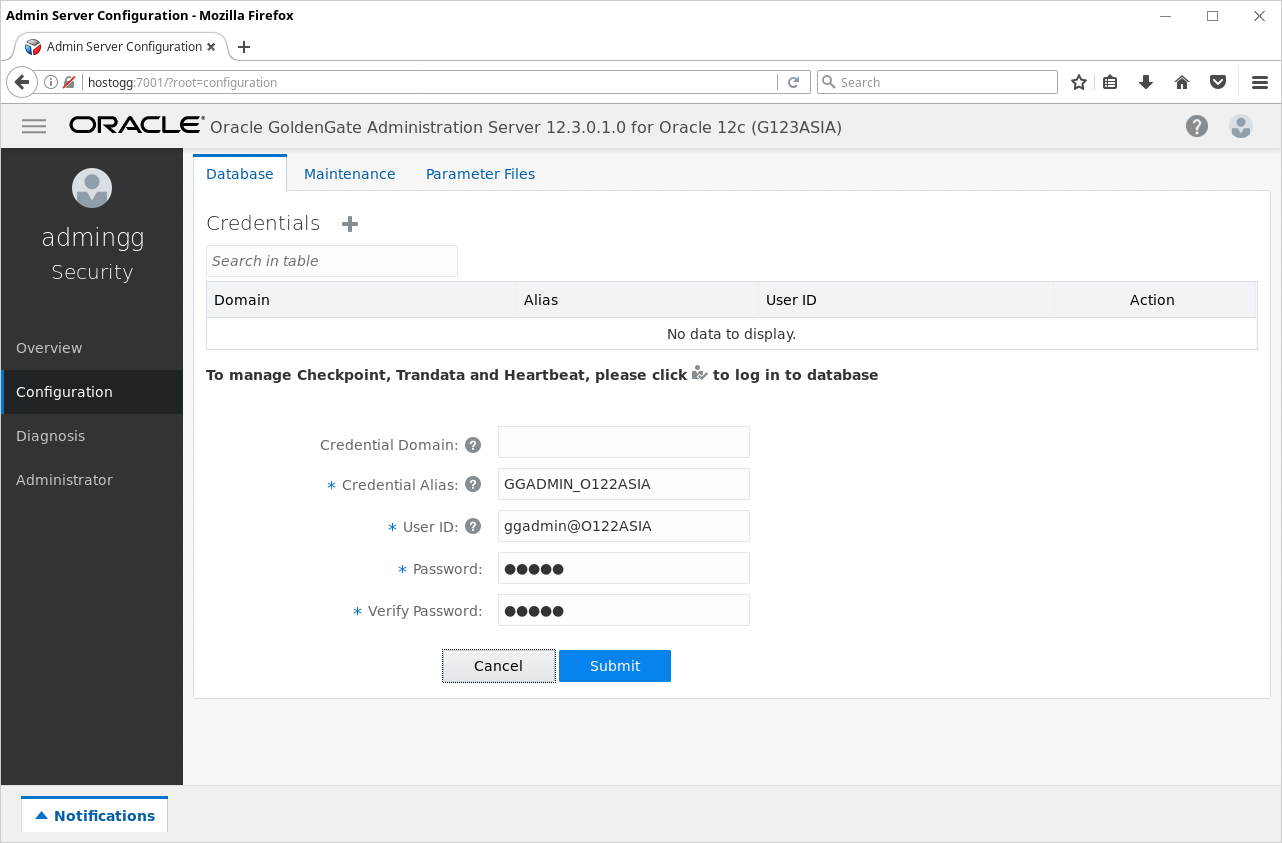
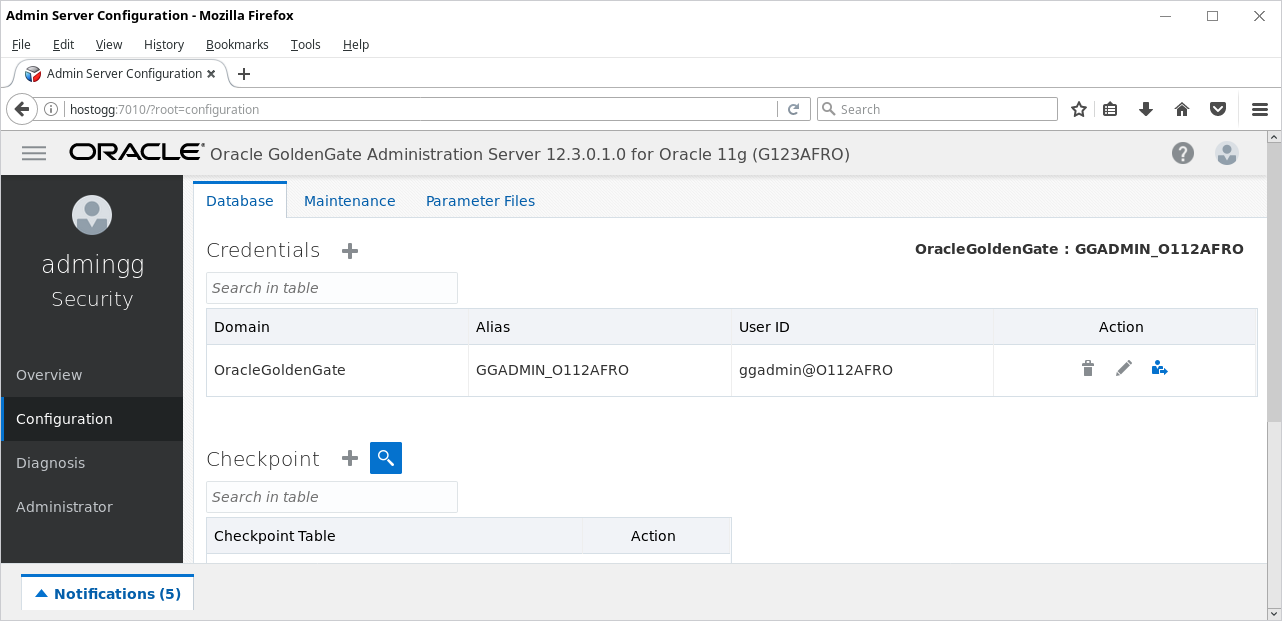
Next click on the right side icon – Log in to database.

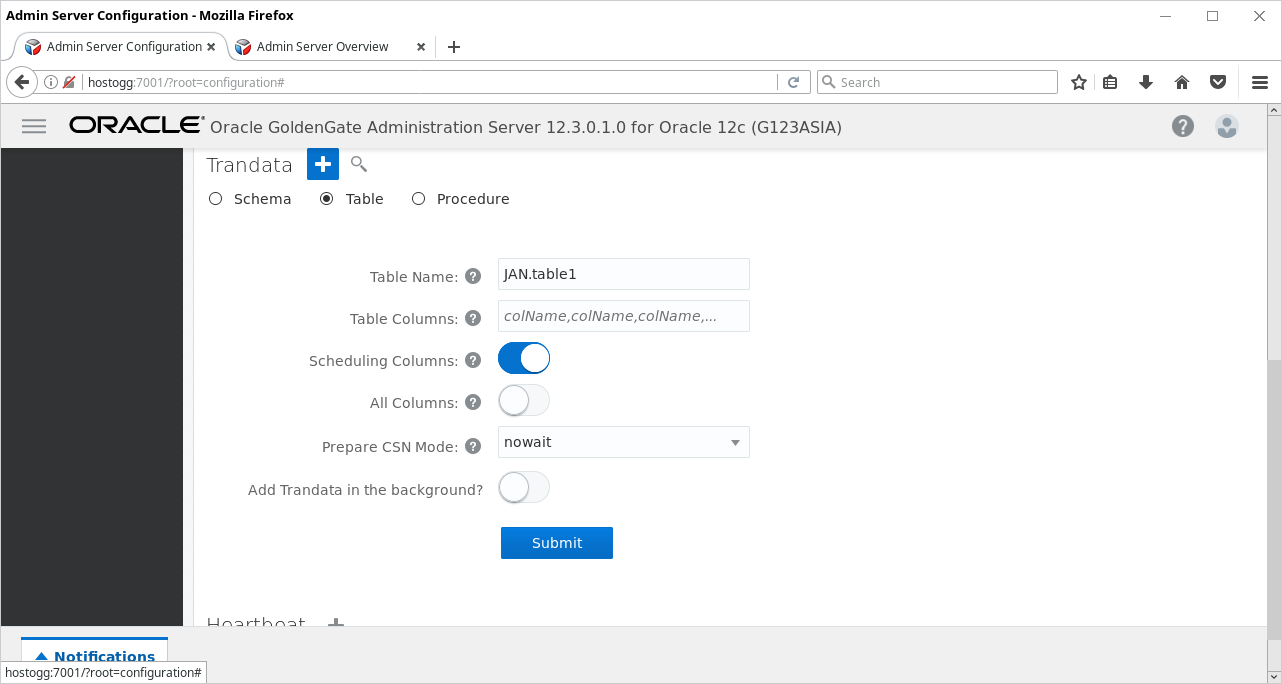
The next step is to create the TRANDATA. Click the (+) next to the Trandata option:

Enter table details, name: JAN.table1 and click Submit.
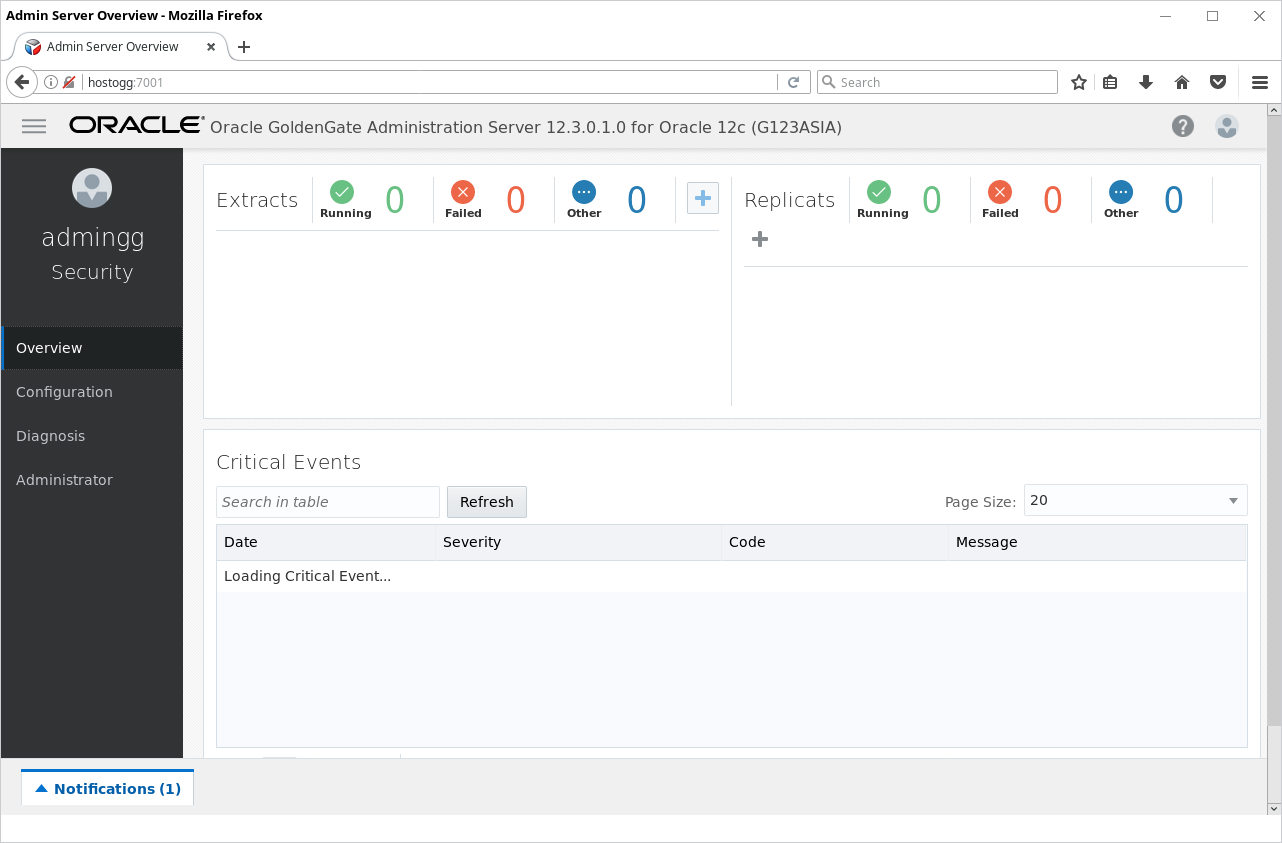
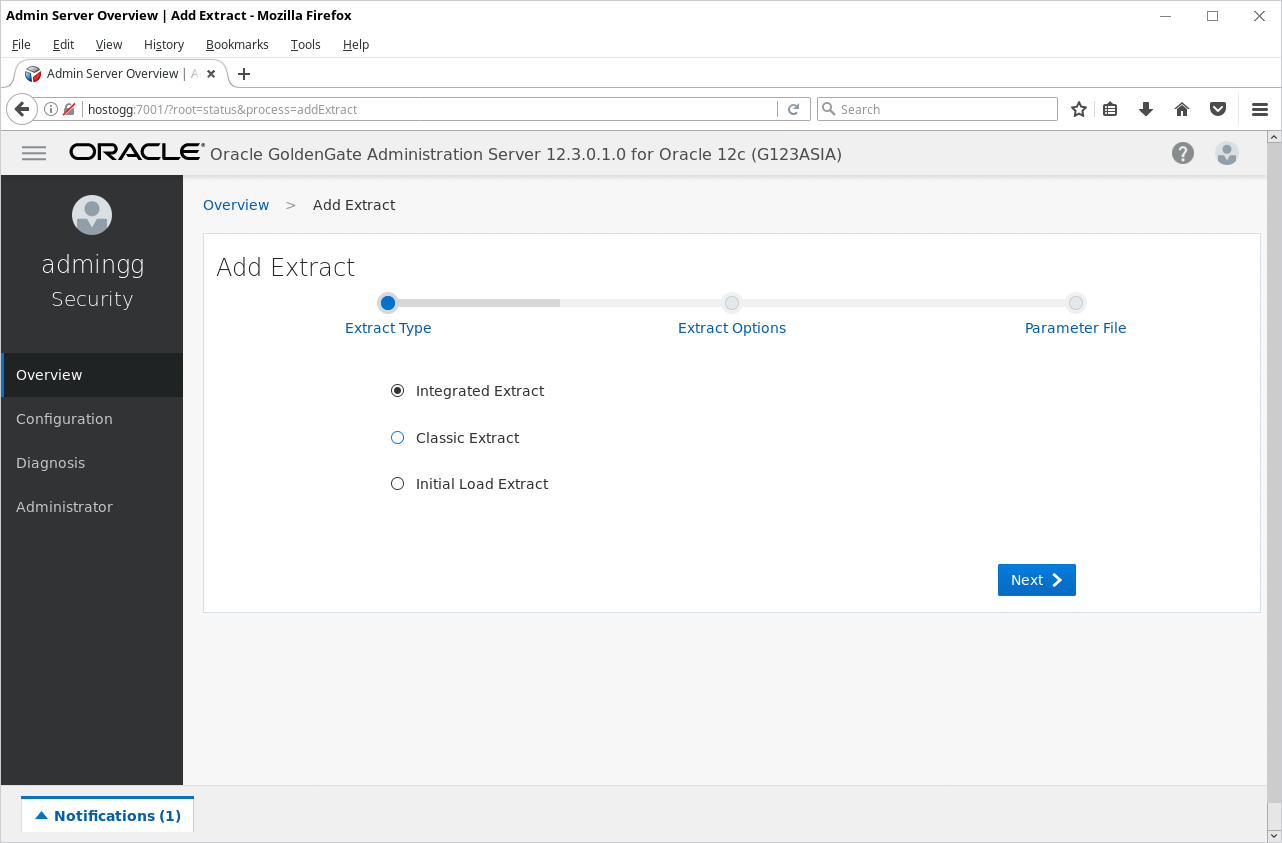
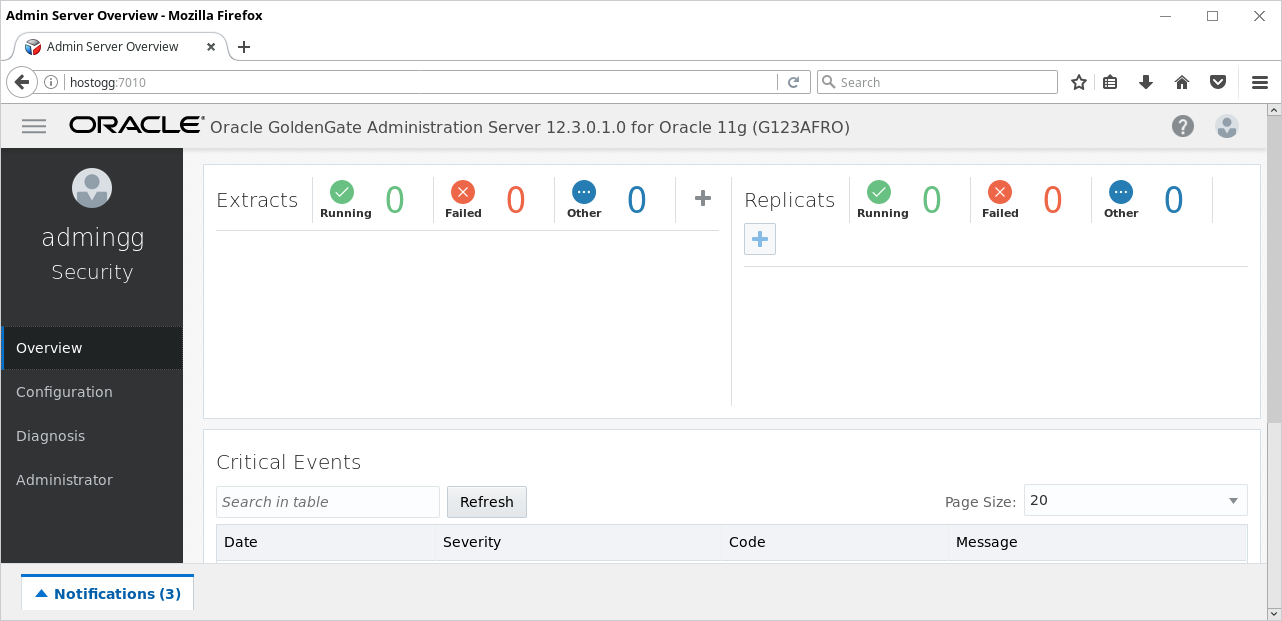
Next go to Overview tab (menu on the left) and click to add new Extract using the (+) icon:
Choose Integrated Extract:
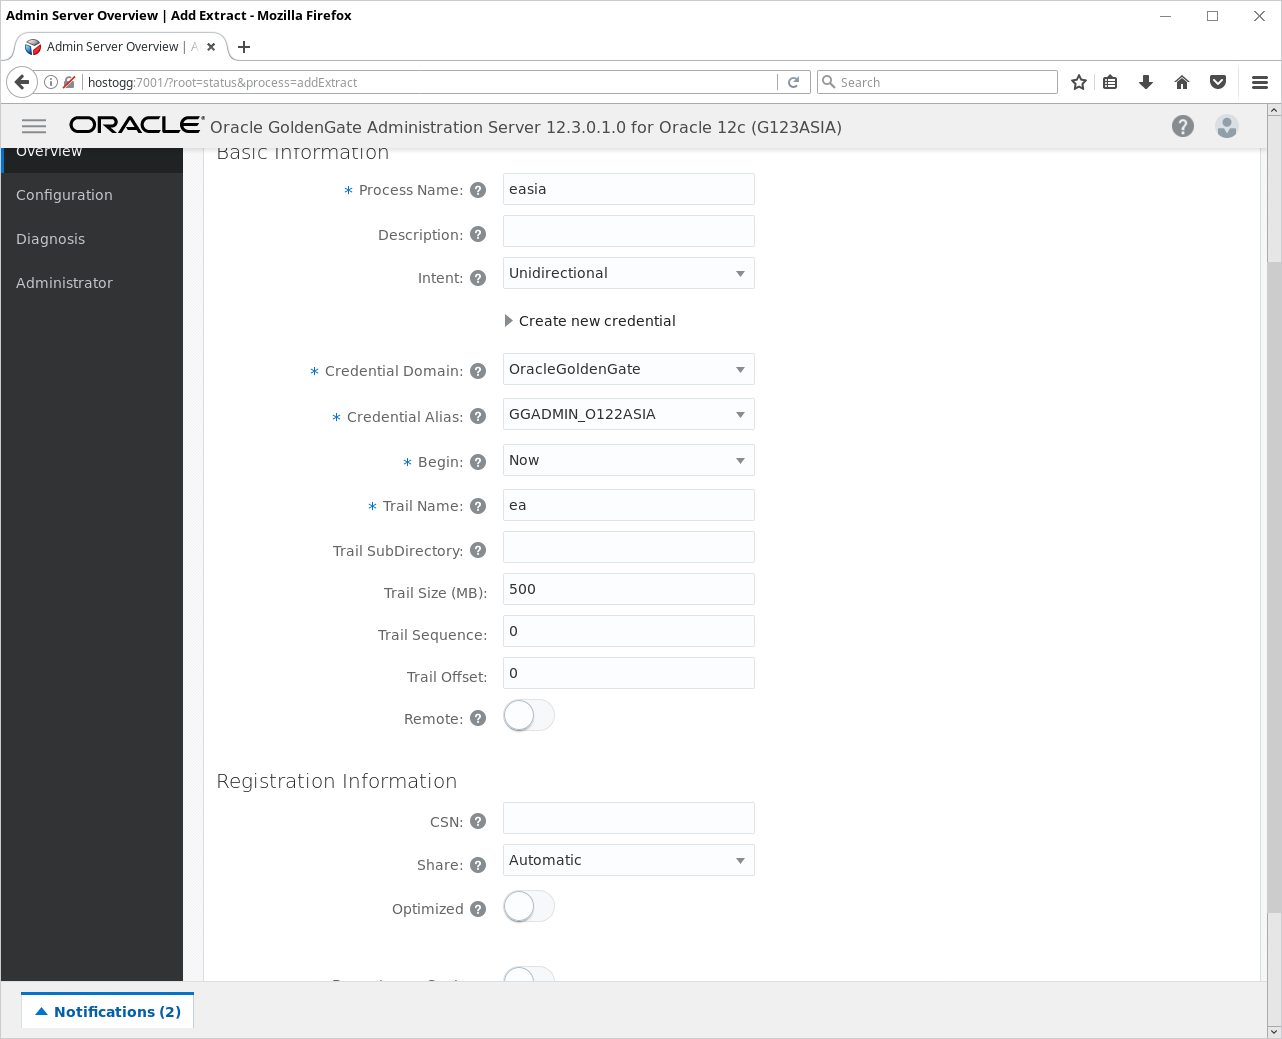
Enter parameters:
- Process name: easia
- Credentialstore domain: OracleGoldenGate
- Credential Alias: GGADMIN_O122ASIA
- Begin: Now
- Trail Name: ea
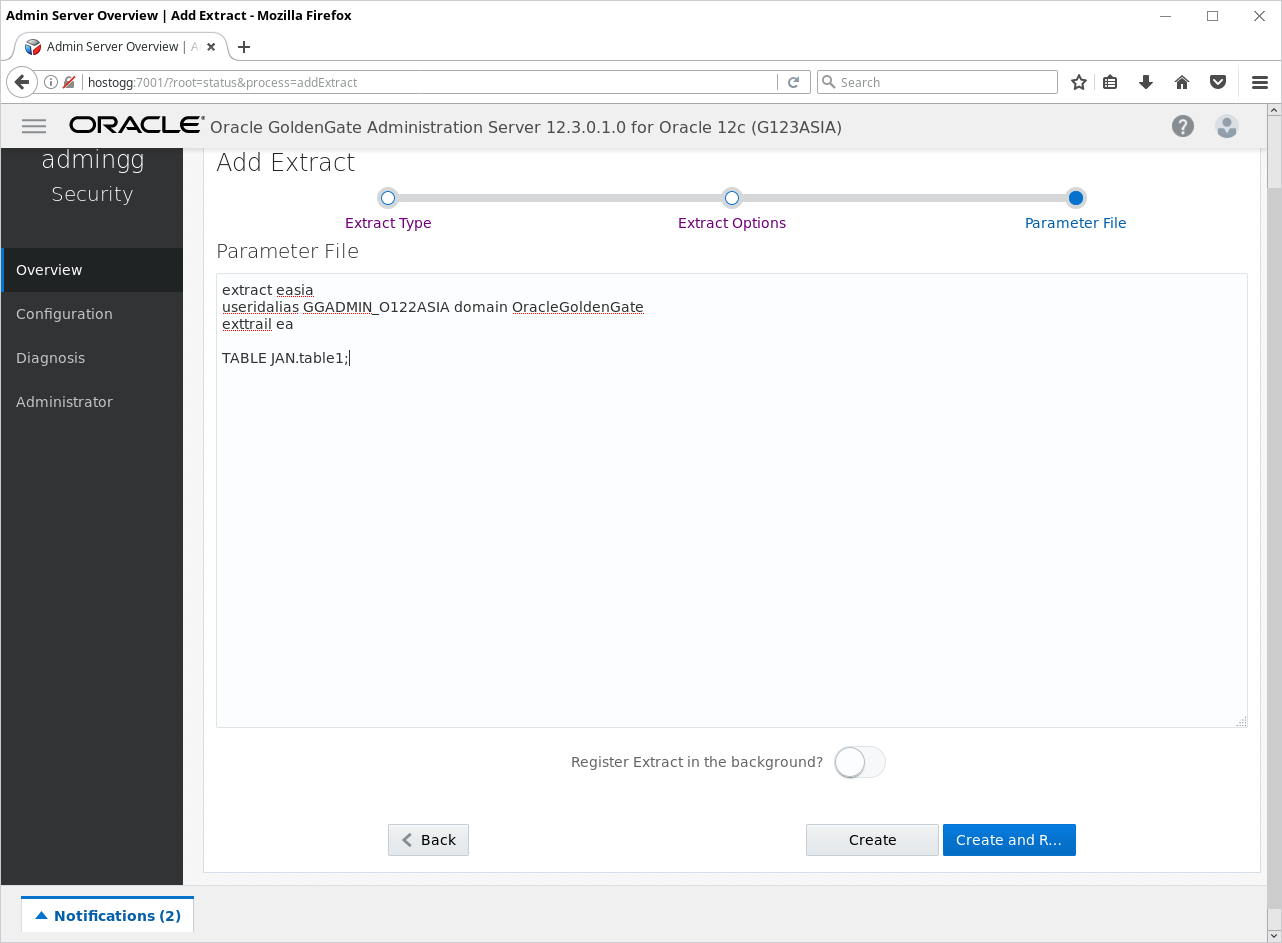
Add the table to the list by adding to the end of the parameter file:
TABLE JAN.table1
And finish the creation clicking Create and Register:
Creating Extract process might take some time. Once it is completed it should be up an running:
Since the Extract process is up and running, generate some traffic on the source database server. On O122ASIA run SQL script:
insert into JAN.table1 values (1, 'val1');
commit;
We are not yet replicating the data, just checking if the Extract process works. You might notice that some data appeared in file /opt/gg/G123ASIA/var/lib/data/ea000000000
4.1. Configuring Integrated Extract on Oracle 12.1.0.2
It is worth mentioning that trying to configure Extract process with the Oracle 12.1.0.2 database fails. An error message appears like this:
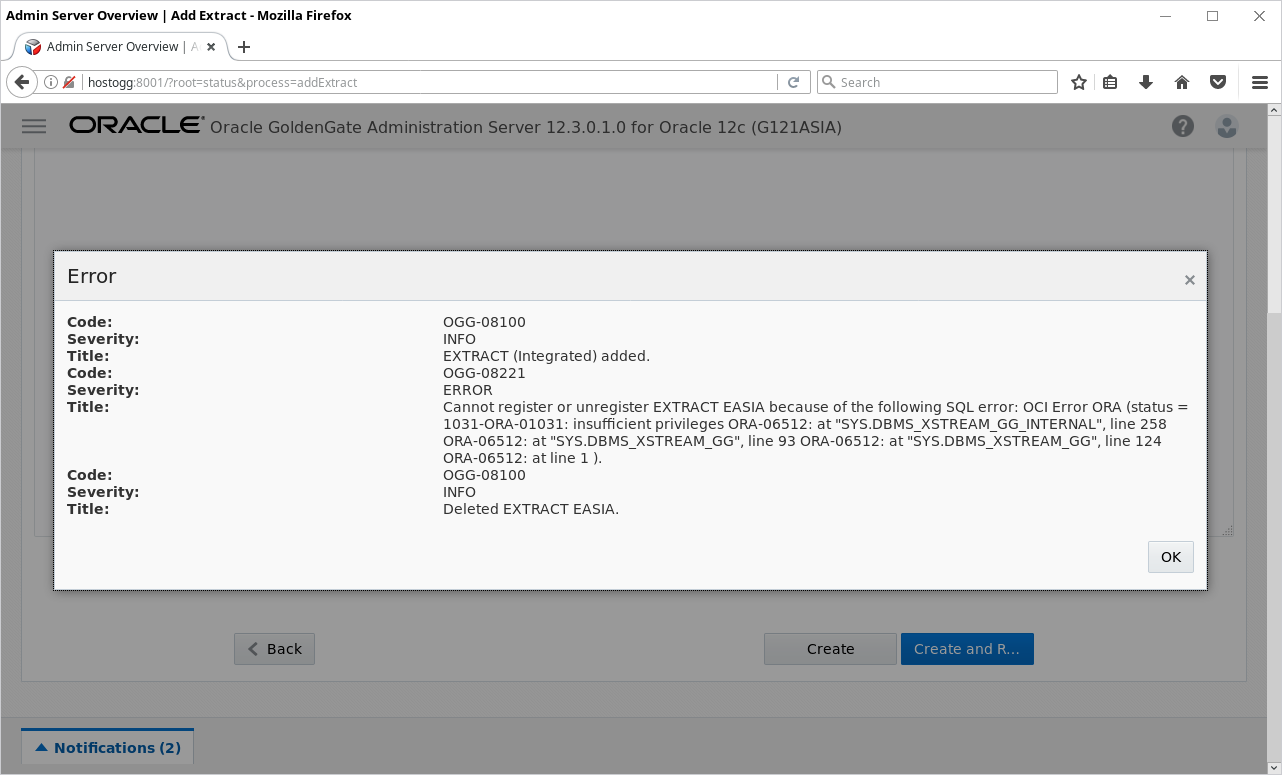
The message is:
Error:
Code: OGG-08100
Severity: INFO
Title: REPLICAT (Integrated) added.
Code: OGG-06594
Severity: INFO
Title: Replicat RASIA has been altered. Even the start up position might be updated, duplicate suppression remains active in next startup. To override duplicate suppression, start RASIA with NOFILTERDUPTRANSACTIONS option.
Code: OGG-08100
Severity: INFO
Title: REPLICAT (Integrated) altered.
Code: OGG-00945
Severity: WARNING
Title: Startup of REPLICAT RASIA failed (No additional details)
Code: OGG-00975
Severity: INFO
Title: REPLICAT RASIA starting
Code: OGG-08100
Severity: INFO
Title: Deleted REPLICAT RASIA.
Probably Oracle 12.1.0.2 database is not yet certified with OGG 12.3 Microservices Edition. The problem is probably not related to grants as the operation fails even if the database user has DBA role. Actually OGG MA calls different SQL commands than OGG Classic while registering and creating the Extract process.
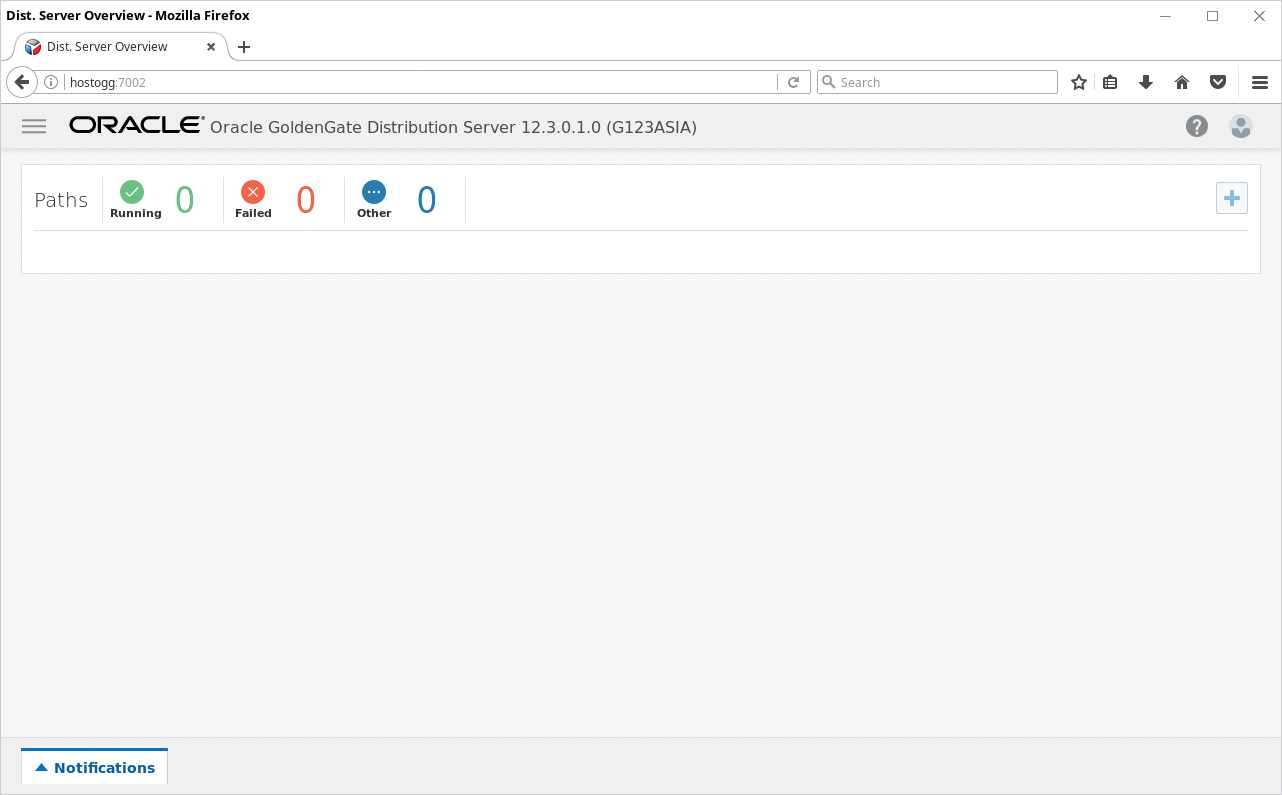
5. Pump configuration
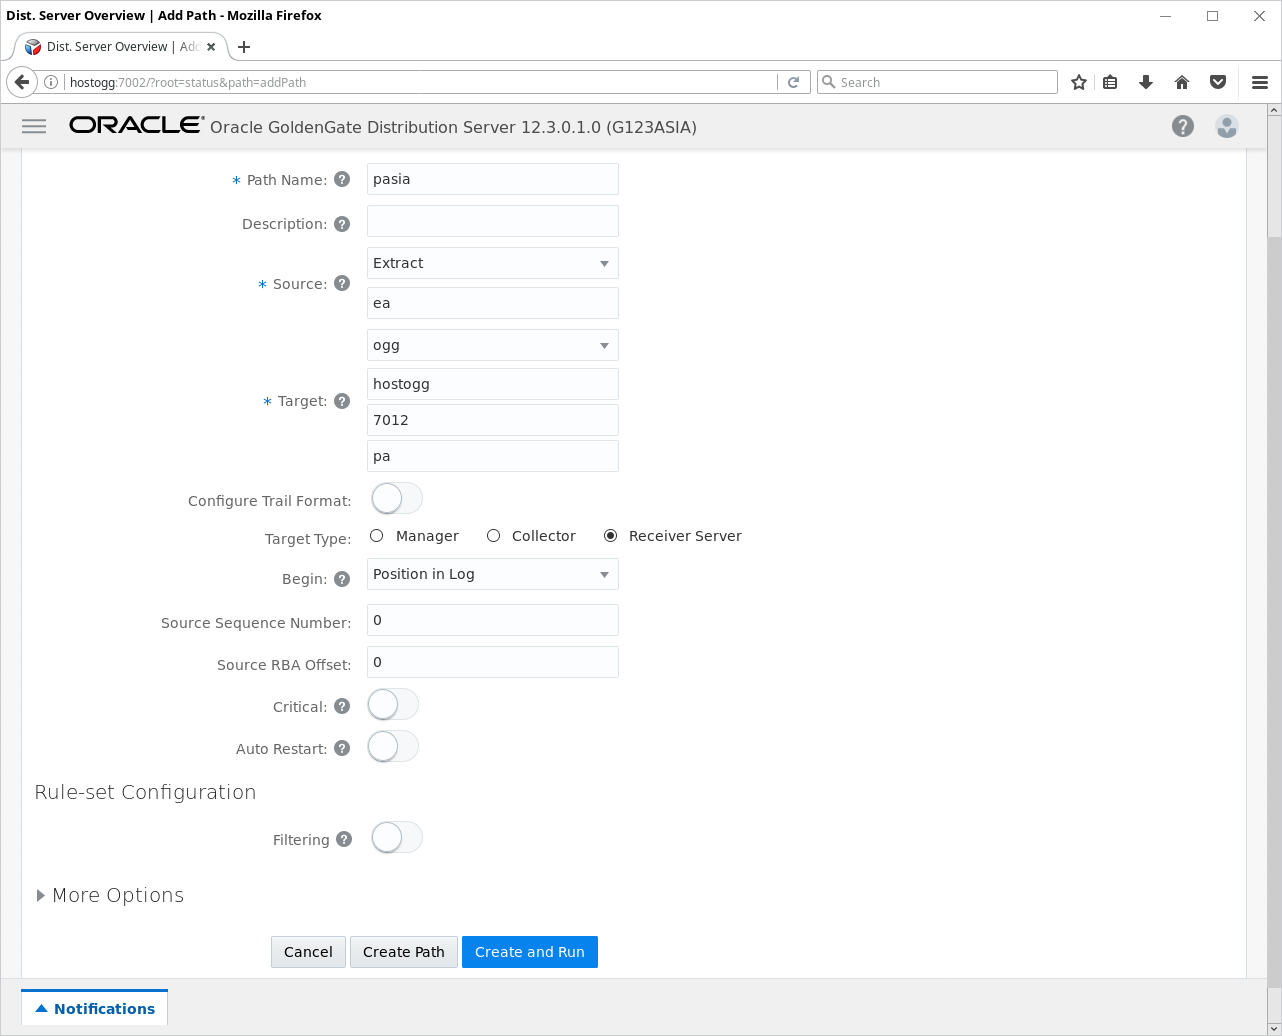
I’m intentionally using OGG Classic Architecture terminology here to easier identify the task for someone who has used OGG earlier. Instead of Pump process you create a Path in the Distribution Server. Connect to http://hostogg:7002/ and click (+) sign next to the path list:
Enter parameters for Path:
- Path name: pasia
- Source: Extract, ea, ogg
- Target: hostogg, 7012, pa
- Begin: now
Next click Create and Run.
The path creation can take a few seconds. The result should look like that:
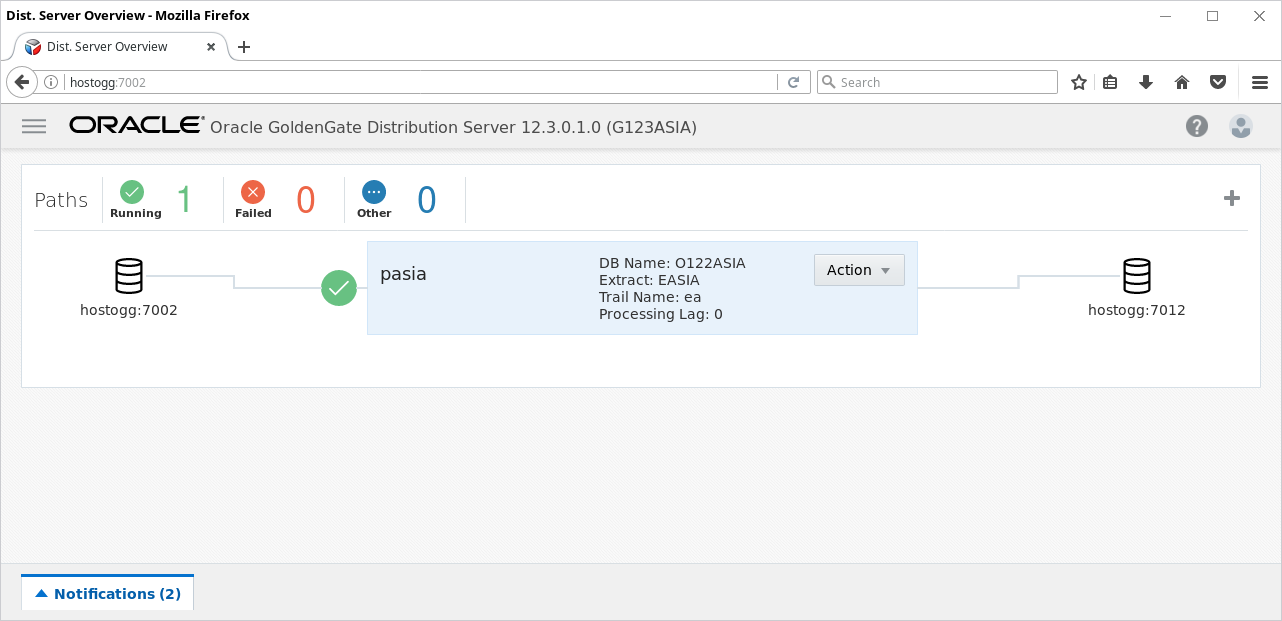
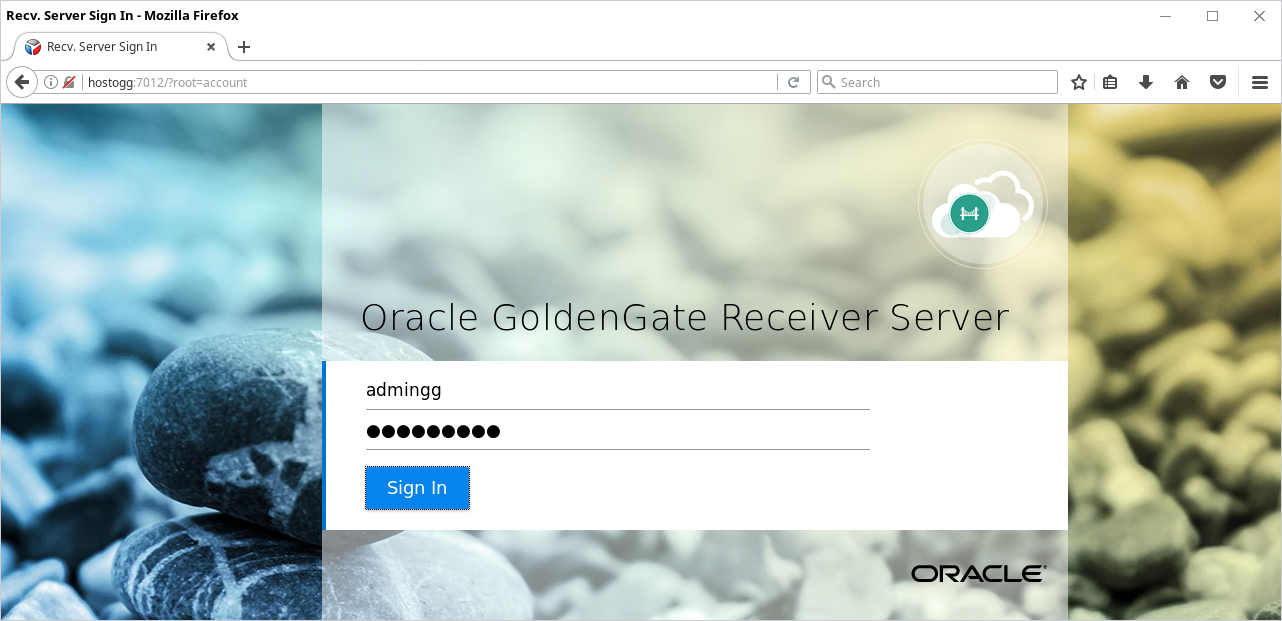
Check on the Receiver site if the Path has been created properly. Log in to http://hostogg:7012/ using admingg/adminPWD1 credentials:
The target server should see some incoming data from the source:
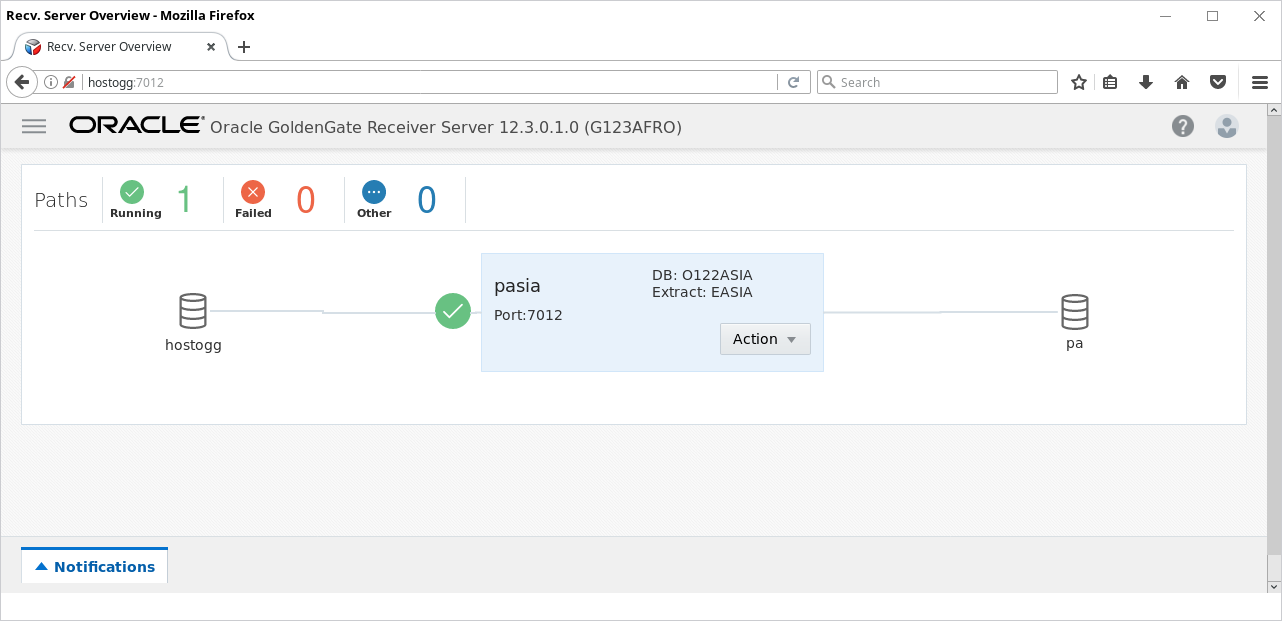
A trail file should appear on the target Deployment (G123AFRO). At this point check that a file appeared: /opt/gg/G123AFRO/var/lib/data/pa000000000
Put another transaction and check if the size and time stamp of trail file changed. Run on O122ASIA:
insert into JAN.table1 values (2, 'val2');
commit;
6. Replicat configuration
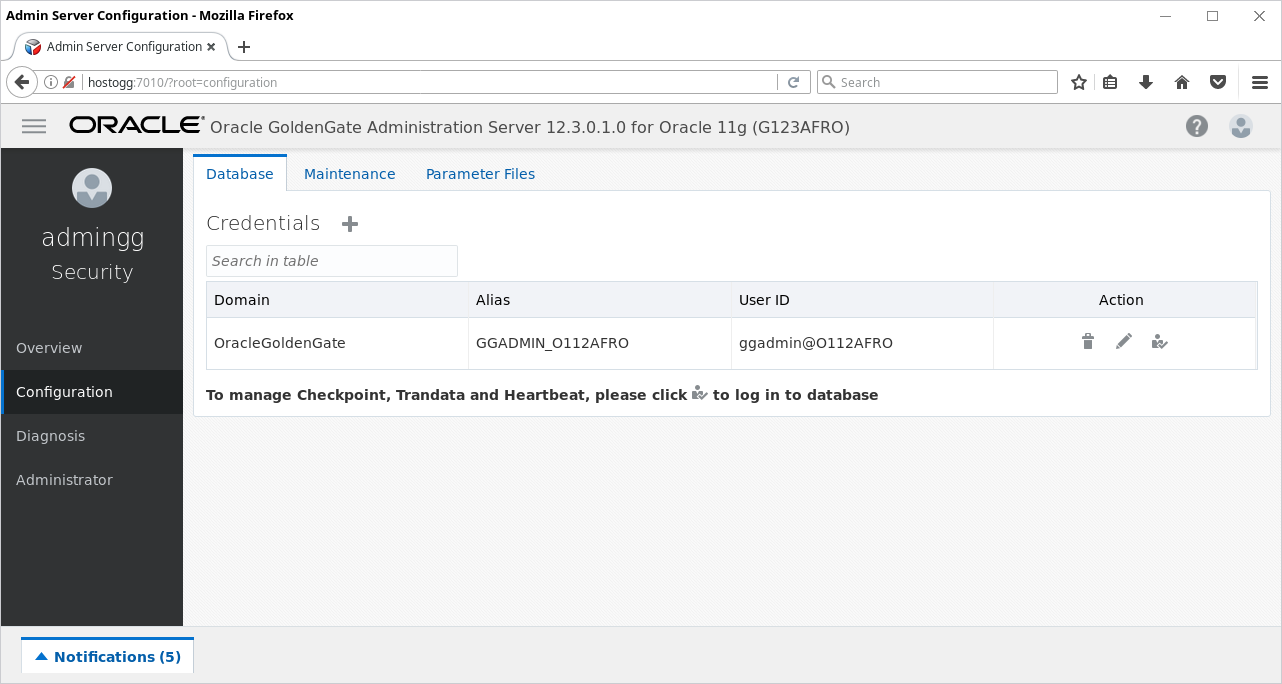
Go to the Admin Server: http://hostogg:7010/ and go to Configuration tab. Next click (+) to add credential store:
Enter details:
- Alias: GGADMIN_O112AFRO
- User ID: ggadmin@O112AFRO
- Password: ggpwd
Click Submit:
Log in to the database using far most right icon (like before with G123ASIA):
Go back to Overview tab and Create Replicat process – click on (+):
Select Integrated Replicat:
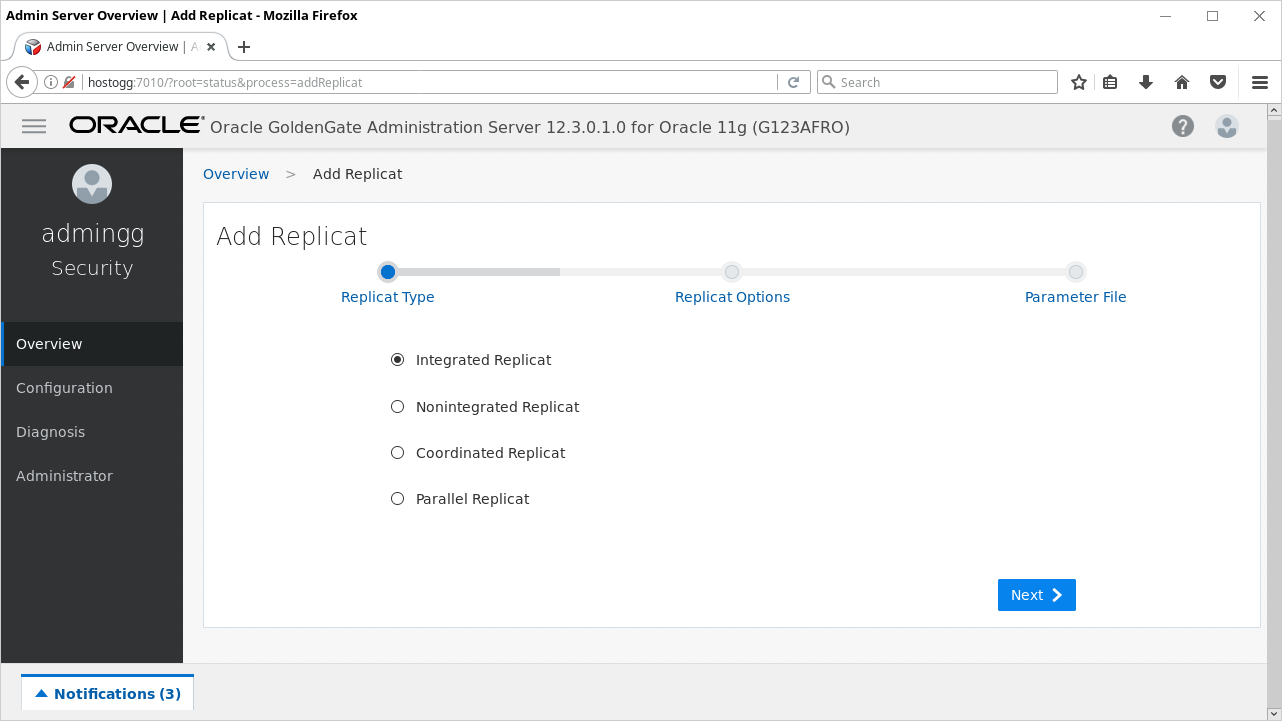
Enter parameters:
- Process name: rafro
- Credentialstore domain: OracleGoldenGate
- Credential Alias: GGADMIN_O112AFRO
- Begin: Position in Log
- Transaction Log Sequence Number: 0
- Transaction Log RBA Offset: 0
- Trail Name: pa
Click Next:

Replace:
MAP *.*, TARGET *.*;
with:
MAP JAN.table1, TARGET JAN.table1;
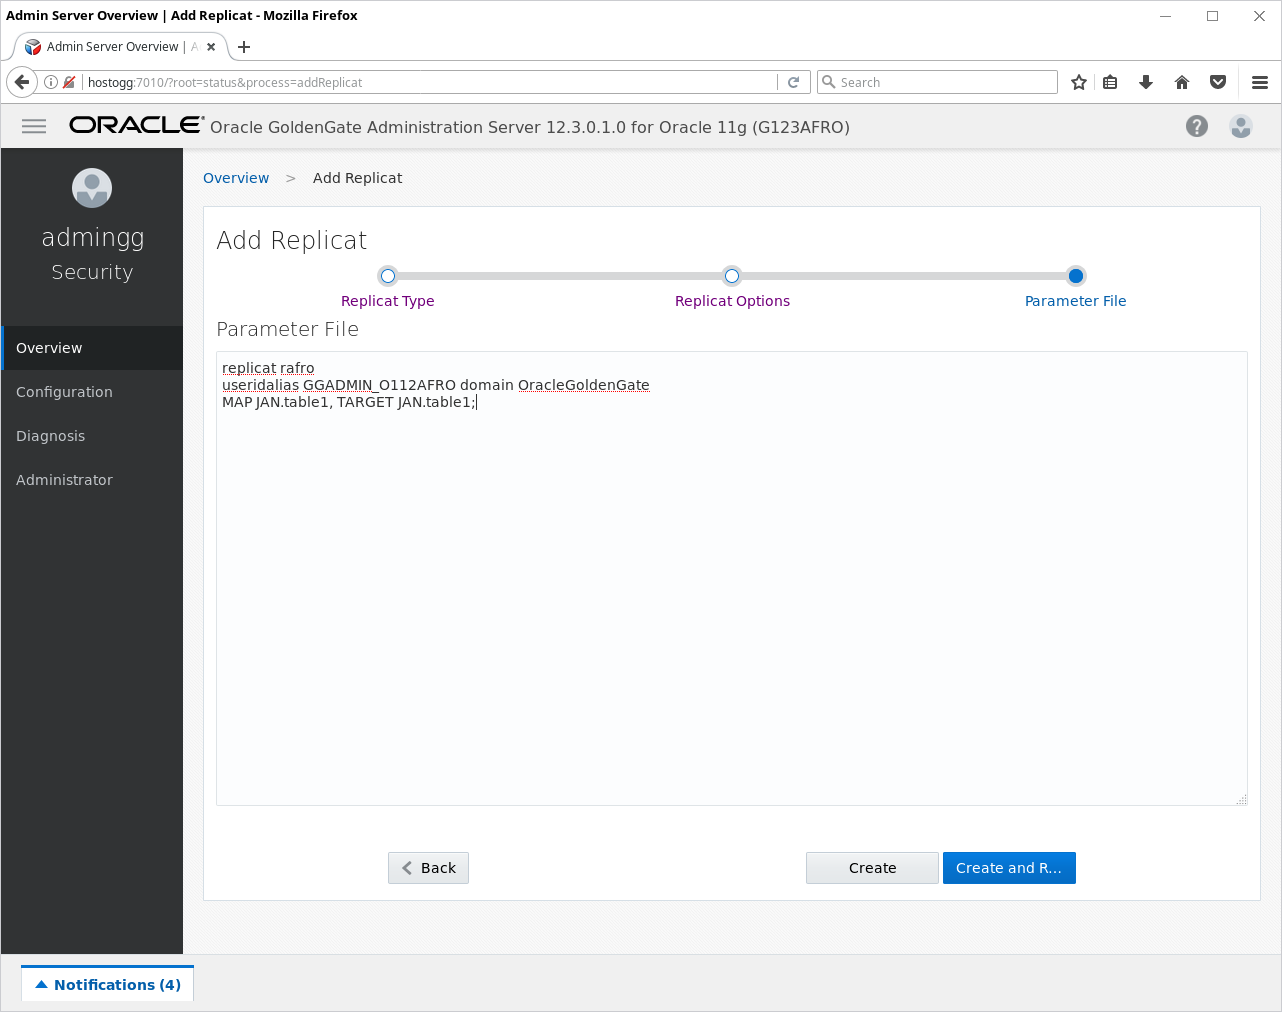
Next click Create and Register. A new and working Replicat process should appear in the list:
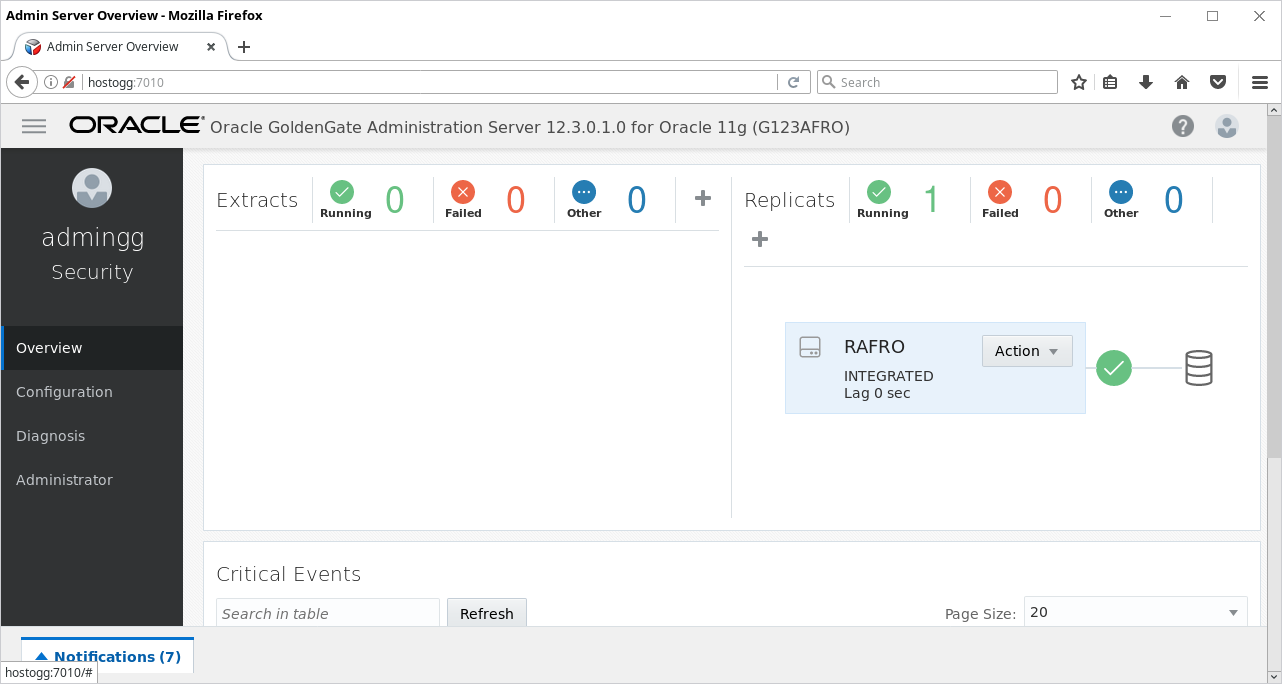
Test the replication on O122ASIA:
insert into JAN.table1 values (3, 'val3');
commit;
And on O112AFRO all rows should be present:
SQL> select * from JAN.table1;

A          B
---------- ------------------------------------------------------------
 1 val1
 2 val2
 3 val3
The online replication is working! This concludes the configuration of replication using Oracle GoldenGate Microservices Architecture for Oracle.
Now you can experiment with the environment and check different features by yourself.
7. Errors
During the installation you might run into many errors. Also warning appear all the time with strange messages (like unable to create log file, which exists). I have listed just a few of them which can cause problems:
In the log you might find in the /opt/gg/G123AFRO/var/log/ER-events.log file:
2017-09-04T19:31:32.427+0200 ERROR OGG-00870 Oracle GoldenGate Delivery for Oracle, RAFRO.prm: Database error 942 (ORA-00942: table or view does not exist SQL select transaction_id, commit_position from SYS."_DBA_APPLY_PROGRESS" where apply# = :1 and (1 = (case when (utl_raw.length(commit_position) = :2) and commit_position >= :3 then 1 when (utl_raw.length(commit_position) > :4) then 1 else 0 end))).
2017-09-04T19:31:32.427+0200 ERROR OGG-01668 Oracle GoldenGate Delivery for Oracle, RAFRO.prm: PROCESS ABENDING.
Then it means that the grant to select from SYS._DBA_APPLY_PROGRESS is missing.
The message:
2017-09-04T19:36:40.699+0200 WARNING OGG-00869 Oracle GoldenGate Delivery for Oracle, RAFRO.prm: Error (942, P$C��.) start select in getColAttrsFromCatalog.
2017-09-04T19:36:40.704+0200 ERROR OGG-00665 Oracle GoldenGate Delivery for Oracle, RAFRO.prm: OCI Error describe for query (status = 942-ORA-00942: table or view does not exist), SQL<SELECT c.name, c.col#,
 c.segcol#, c.intcol#, c.type#, c.length, 1 - c.null$ nullable, c.precision#, c.scale, c.charsetid, c.charsetform, c.property, tc.data_type, tc.data_type_owner, tc.data_precision, tc.data_length, tc.char_u
sed, tc.char_length, opq.flags, (SELECT max(segcol#) FROM sys.col$ sc WHERE sc.obj# = o.obj# and sc.col# = c.col# and c.segcol# = 0) storage_segcol, 0 FROM sys.user$ u, sys.obj$ o, sys.col$ c, dba_tab_c
ols tc, sys.opqtype$ opq WHERE u.user# = o.owner# AND u.name = tc.owner AND tc.owner = :owner_name AND o.obj# = c.obj# AND o.name = tc.table_name AND tc.table_name = :table_name AND c.intcol# = tc.inte
rnal_column_id AND c.obj# = opq.obj# (+) AND c.intcol# = opq.intcol# (+) AND 1 = opq.type (+) AND o.type# in (2, 3, 4) ORDER BY c.intcol# >.
2017-09-04T19:36:43.713+0200 ERROR OGG-01668 Oracle GoldenGate Delivery for Oracle, RAFRO.prm: PROCESS ABENDING.
To avoid this error I have created grant to select from dictionaries. Actually less privileges might solve the issue.
I like your post here, regarding the DB12.1 failed to register issue, it happened on specific version of database under 12.1 only, you may patch it to fix it, thanks.
This was awesome . I like the presentation. I realized that you failed to mention the fact that we have to go the Service manager home which is (/OGGSM/bin) and to the bin directory to start the service manager
startSM.sh script
I had to start this before running the gui , without which i was faced with several failures .
Thanks very Much
Hi Tanyi, thanks for the comment. I have added the note about starting the Service Manager.
Hi,
Have you faced any installation issues like
2018-01-10T01:02:46.510+05:30 | SEVERE | > GET https://192.168.1.4:7000/services/v2/deployments HTTP/1.1
2018-01-10T01:02:46.510+05:30 | SEVERE | > Accept-Charset: UTF-8
2018-01-10T01:02:46.511+05:30 | SEVERE | > Accept: application/json
2018-01-10T01:02:46.511+05:30 | SEVERE | > Content-Type: application/json
2018-01-10T01:02:46.511+05:30 | SEVERE | >
2018-01-10T01:02:46.518+05:30 | SEVERE | Rest call exception: Connection failed for URL ‘https://192.168.1.4:7000/services/v2/deployments’ – Connection refused (Connection refused)
java.net.ConnectException: Connection refused (Connection refused)
at java.net.PlainSocketImpl.socketConnect(Native Method)
at java.net.AbstractPlainSocketImpl.doConnect(AbstractPlainSocketImpl.java:350)
at java.net.AbstractPlainSocketImpl.connectToAddress(AbstractPlainSocketImpl.java:206)
at java.net.AbstractPlainSocketImpl.connect(AbstractPlainSocketImpl.java:188)
at java.net.SocksSocketImpl.connect(SocksSocketImpl.java:392)
at java.net.Socket.connect(Socket.java:589)
at java.net.Socket.connect(Socket.java:538)
at sun.n
firewall service is disabled
selinux is disabled
still facing issue can you suggest
Hi @Pavan,
A connection refused error shows that this problem could be related to network issues. I would first check if the network connection is open/there are no network issues. You could try to test it with telnet to check if you are able to connect to the specific port. You could test with telnet from different network locations.
HTH,
Adam
Hi,
Thank-you for you reply, I have tested on oracle lnux 5,6 and 7 versions 64 bit on VMware, with java (JDK) 8 its keeps failing with same error
1. iptables are disabled
2. firewall disabled
3. se Linux disabled
still its fails with same issue
java.net.ConnectException: Connection refused
secondly for every other port in Linux it fails not sure why its happening
root@myhost ~]# telnet 192.168.1.2 22
Trying 192.168.1.2…
Connected to myhost.home.com (192.168.1.2).
Escape character is ‘^]’.
SSH-2.0-OpenSSH_4.3
^C
Connection closed by foreign host.
[root@myhost ~]# telnet 192.168.1.2 7000
Trying 192.168.1.2…
telnet: connect to address 192.168.1.2: Connection refused
telnet: Unable to connect to remote host: Connection refused
[root@myhost ~]# telnet 192.168.1.2 8000
Trying 192.168.1.2…
telnet: connect to address 192.168.1.2: Connection refused
telnet: Unable to connect to remote host: Connection refused
Not sure whats wrong with every other ports
Hi Adam,
Thanks for sharing the steps very informative. I am facing issues while trying to login into service manager for 11g database. it is just throwing me out of the portal with the below error in notification tab.
OGG-12604 | The authorization information for ‘GET /services/v2/currentuser’ is missing, invalid or not properly formed.
OGG-12604 | The authorization information for ‘GET /services/v2/targets’ is missing, invalid or not properly formed.
OGG-12604 | The authorization information for ‘GET /services/v2/summary’ is missing, invalid or not properly formed.
Hi Imran, I did not have time to look into your issue. I do not have any OGG MA configuration running so it is difficult to help you. Have you tried looking for help with support or on the Community Oracle forum? I think that it would be the best place to start. Good luck with your OGG instances, Adam
If you are interested in viewing the Performance Metrics server , during the installation of the micro service , make sure you enable monitoring on the Gui interface . This will enable the service manager to display the performance metrics server
How to setup alerts ?
is this available to install through silent mode?
To solve the problem on 12.2, you need to install patch.
For version 12.1.0.2 it was patch p20448066_121020_Linux-x86-64.zip. See My Oracle Support Document 244241.1
Very well written and explained . Thanks for sharing!
Thanks for the article. It would be nice to add a line at the beginning of each section saying “the following is to be done on host xxx”. Some screenshots show hostname such as demawend. But only hostdb and hostogg are mentioned at the very beginning. Oracle official documentation is also missing such info. So reading it is confusing.
Thanks for the article. It would be nice to add a line at the beginning of each section saying “the following is to be done on host xxx”. Some screenshots show hostname such as demawend. But only hostdb and hostogg are mentioned at the very beginning. Oracle official documentation is also missing such info. So reading it is confusing.