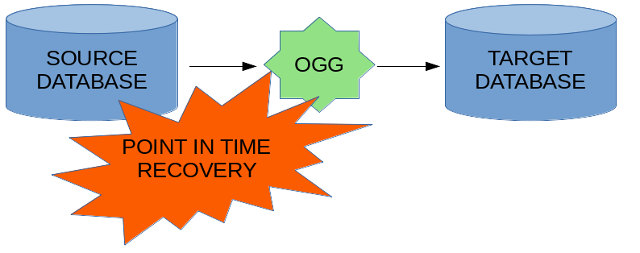
Even though you would like to secure the database from any disaster with HA, still it might happen that the database gets corrupted and a recovery from backup is needed to recover the database. In a critical scenario you might need to use Point In Time Recovery (PITR).
Let’s focus on a scenario when the source database needs to be recovered from backup to an earlier point in time. How to resync a replication to the target database without the need of a full initial load?
Unfortunately this scenario is not covered by any known GoldenGate manual nor any White Paper or Oracle Service Request. It is very surprising, because this is a very basic scenario.
1. Plan
The scenario is:
- Database A contains tables that are replicated to Database B
- Database B beside replicated tables contains also other objects in a different table space
- Database A is corrupted and is recovered to an earlier point in time (using PITR)
- The replication to Database B is out of sync (contains some data that do not exists on Database A)
Let’s assume that we can not use basic techniques like:
- Go back in time with Database B with flashback database options
- Use the reverse tool from OGG (to reverse the transactions) – it has been deprecated by Oracle and it now obsolete – it has been removed in OGG 12.3
But we do have basic recovery tools like:
- Trail files with transactions that have been replicated
- Backup of the Database B (including archived redo logs)
- The table space with replicated tables does not contain any other objects
2. Solution
The basic recovery scenario would be as following:
- Run restore & recovery for Database A to a SCN
- Run restore & recovery for Database B for table space that is the target of replication
- Resume replication and so that all transactions up to some SCN got replicated
- Reset replication and resume client work on Database A
Of course it could be possible to resume the database activity on Database A before all got replicated correctly to Database B but for the simplicity of this blog post I will stick to the easier scenario.
3. Environment
All scenarios described in this post are run on x86_64 Linux machine with:
- OGG 12.3.0.1.4
- Database 12.2.0.1 + RU 12.2.0.1.180417
I will use Integrated Extract & Integrated Replicat to make the recovery scenario more interesting. The solution presented here should also work with other types of Extract & Replicat with slight modifications in checkpoint table handling.
4. Configuration
Database A (SID = O122C) – the source for the replication:
CREATE TABLESPACE adam DATAFILE SIZE 10M AUTOEXTEND ON NEXT 10M BLOCKSIZE 8192;

CREATE USER adam IDENTIFIED BY adampwd DEFAULT TABLESPACE adam TEMPORARY TABLESPACE temp;
ALTER USER adam QUOTA UNLIMITED ON adam;
GRANT CONNECT TO adam;
GRANT RESOURCE TO adam;

CREATE TABLE adam.TAB1(
  PK1 numeric not null
);
ALTER TABLE adam.TAB1 ADD CONSTRAINT TAB1_PK PRIMARY KEY(PK1);
Database B (SID = O122D) – the target for the replication:
CREATE TABLESPACE ANNA DATAFILE SIZE 10M AUTOEXTEND ON NEXT 10M BLOCKSIZE 8192;

CREATE USER ANNA IDENTIFIED BY annapwd DEFAULT TABLESPACE anna TEMPORARY TABLESPACE temp;
ALTER USER ANNA QUOTA UNLIMITED ON ANNA;
GRANT CONNECT TO ANNA;
GRANT RESOURCE TO ANNA;

CREATE SEQUENCE anna.TAB1SEQUENCE;
CREATE TABLE anna.TAB1(
  PK1 numeric not null
);
ALTER TABLE anna.TAB1 ADD CONSTRAINT TAB1_PK PRIMARY KEY(PK1);
GRANT SELECT, INSERT, UPDATE, DELETE ON anna.TAB1 TO ggadmin;
Let’s define the following Extract process:
EXTRACT extr
USERID ggadmin@O122C, PASSWORD ggpwd
EXTTRAIL dirdat/ea
TABLE adam.TAB1;
And the following Replicat process:
REPLICAT repl
USERID ggadmin@O122D, PASSWORD ggpwd
GROUPTRANSOPS 1
MAP adam.TAB1, TARGET anna.TAB1;
This replication configuration will guarantee some extra data in the TAB1 table on the target.
Before making transactions I have run a full backup of both databases:
BACKUP AS COMPRESSED BACKUPSET DATABASE PLUS ARCHIVELOG;
Both – source and target database work in archivelog mode. Let’s generate some transactions:
BEGIN
  FOR x IN 1..1000000 LOOP
    insert into adam.TAB1 select x, current_scn from v$database;
    commit;
  END LOOP;
END;
/
On the target all the data is replicated:
SQL> select count(*) from anna.TAB1;

  COUNT(*)
----------
   1000000
All OGG processes are up and running:
GGSCI (nuc.localdomain) 1> info all

Program     Status      Group       Lag at Chkpt  Time Since Chkpt

MANAGER     RUNNING
EXTRACT     RUNNING     EXTR        00:00:00      00:00:03
REPLICAT    RUNNING     REPL        00:00:00      00:00:08
5. Disaster and recovery of source database
Let’s simulate a disaster of the source database and the need of a recovery using PITR.
We have the following archive log available for recovery:
SQL> select RECID, FIRST_CHANGE# from v$archived_log;

     RECID FIRST_CHANGE#
---------- -------------
         1        493694
         2        499313
         3        499380
         4       1030771
         5       1530276
         6       2048102
         7       2580017
         8       3093690

8 rows selected.
Let’s assume that the archive log 7 is corrupted and the database can be restored only till SCN 2580016. Let’s restore it:
shutdown abort;
startup mount;
run {
  set until scn 2580016;
  restore database;
  recover database;
  alter database open resetlogs;
}
The database is now restored, but unfortunately the last inserted row is row:
SQL> select count(*) from adam.TAB1;

  COUNT(*)
----------
    674440

SQL> select max(pk1) from adam.TAB1;

  MAX(PK1)
----------
    674440
The Extract process is now abended, but it does not matter for the moment:
GGSCI (nuc.localdomain) 2> info all

Program     Status      Group       Lag at Chkpt  Time Since Chkpt

MANAGER     RUNNING
EXTRACT     ABENDED     EXTR        00:00:00      00:07:45
REPLICAT    RUNNING     REPL        00:00:00      00:00:09
On the target site we have newer data. We need to go back in time with the target database.
6. recovery of target database
Although there are other techniques available let’s suppose that we have just the backup + archived logs.
The first task is to figure out the SCN for the database load for the target which would lead to a point in time before row 674440 has been replicated. If we have some heartbeat table – this would be easy. Let’s look at possible SCN’a:
SQL> select pk1, ora_rowscn from anna.tab1 where pk1 in (1, 674440);

       PK1 ORA_ROWSCN
---------- ----------
         1     501338
    674440    1267976
Of course this method would not work in real life, since not all replications have pure insert operations. Let’s assume that from the heartbeat table we have figured out that SCN = 1000000 could be a good value. For sure the low and high watermarks for the Replicat would be above the chosen value.
Let’s recover the target database to SCN = 1000000 – but just the table space with replicated data.
First, let’s stop the Replicat process:
GGSCI (nuc.localdomain) 3> stop replicat Repl

Sending STOP request to REPLICAT REPL ...
Request processed.


GGSCI (nuc.localdomain) 4> info all

Program     Status      Group       Lag at Chkpt  Time Since Chkpt

MANAGER     RUNNING
EXTRACT     ABENDED     EXTR        00:00:00      00:21:47
REPLICAT    STOPPED     REPL        00:00:00      00:00:07
Now, let’s go back in time with the ANNA table space using Point In Time Tablespace Recovery:
alter tablespace anna offline;
recover tablespace anna until scn 1000000 auxiliary destination '/opt/oradata/tmp';
alter tablespace anna online;
This operation recovers the whole database as an additional (auxiliary) database , it exports the table spaces and imports them into the database using transportable table space.
The table space ANNA has been successfully recovered:
SQL> select count(*) from anna.TAB1;

  COUNT(*)
----------
    437861

SQL> select max(pk1) from anna.TAB1;

  MAX(PK1)
----------
    437863

SQL> select PK1 from anna.TAB1 where PK1 > (select count(*) - 10 from anna.TAB1);

       PK1
----------
    437852
    437853
    437854
    437855
    437856
    437857
    437858
    437859
    437861
    437863

10 rows selected.
We can see that the Integrated Replicat replicates the transactions out of order. This is OK. We are not going to repair this manually. Information about out of order replication should be written in the checkpoint table. If the Replicat was working in a non-integrated mode, then the checkpoint table could be placed in the ANNA table space and we could skip the next step.
7. Replicat checkpoint table recovery
Since the Replicat is working in a integrated mode, and the checkpoints table are in the SYS schema and can not be moved from there. Those checkpoint tables are also not possible to recover using table space or table recovery. So the only way to recover the checkpoint tables is … another Point In Time Recovery of the whole database (excluding user table spaces).
This is not an optimal approach, since a database recovery has just been performed. An optimization could be made here. But for the sake of the example I am not willing to complicate it.
The clone operation would be:
connect TARGET SYS@O122D
connect AUXILIARY /
DUPLICATE TARGET DATABASE TO O122E
BACKUP LOCATION '/opt/fast_recovery_area/O122D'
NOFILENAMECHECK
until scn 1000000
UNDO TABLESPACE SYS_UNDOTS
SKIP TABLESPACE ANNA,GGADMIN;
I have restored just the necessary system table spaces in the new database O122E. This database just contains system table spaces including the required checkpoint tables.
On the O122D let’s create the placeholders:
create table anna.APPLY_PROGRESS as select * from SYS.STREAMS$_APPLY_PROGRESS where 1 = 0;
create table anna.APPLY_MILESTONE as select * from SYS.STREAMS$_APPLY_MILESTONE where 1 = 0;
And let’s copy the checkpoint tables in O122E instance:
create database link O122D connect to system identified by "unknPwd4%" using 'O122D';
insert into anna.APPLY_PROGRESS@O122D select * from SYS.STREAMS$_APPLY_PROGRESS;
insert into anna.APPLY_MILESTONE@O122D select * from SYS.STREAMS$_APPLY_MILESTONE;
commit;
Let’s go back to O122D and replace the checkpoint tables:
delete from SYS.STREAMS$_APPLY_PROGRESS;
delete from SYS.STREAMS$_APPLY_MILESTONE;
insert into SYS.STREAMS$_APPLY_PROGRESS select * from anna.APPLY_PROGRESS;
insert into SYS.STREAMS$_APPLY_MILESTONE select * from anna.APPLY_MILESTONE;
A good question could appear here. Do we need also other checkpoint tables to recover… My previous research shows that not.
Actually the checkpoint tables could contain other data for other Replicat processes which should be filtered out.
8. Resume replication
The last step is to resume replication to replicate missing transactions that are now missing in O122D:
Let’s make sure that the Replicat does not go to far, by adding the parameter to the PARAM file:
MAP adam.TAB1, TARGET anna.TAB1, COLMAP(PK1 = PK1), FILTER(@GETENV('TRANSACTION', 'CSN') <= 2580016);
Now, let’s restart the Replicat:
ALTER REPLICAT repl, EXTRBA 0
ALTER REPLICAT repl, EXTSEQNO 0
start replicat repl
The position to start with could be calculated better if there are also other trails before the failure.
After a while the Replicat process should reach the end of trails and reach the same position for replicated SCN as the source database:
SQL> select max(pk1) from anna.TAB1;

  MAX(PK1)
----------
    674440

SQL> select count(*) from anna.TAB1;

  COUNT(*)
----------
    674440
We could add the END parameter to the Replicat PARAM file to automatically stop after reaching some point.
The goal is reached. Now what is left would be to recreate the OGG processes and resume replication. But this is a peace of cake compared to the steps done so far.
Of course this process could be optimized – the Extract process could be restarted immediately after restoring the database from backup and allowing the user processes to use the Database A (O122C) before the replication is restored in the target Database B (O122D) database.
9. Conclusions
The steps above could be simplified and optimized to better match the SCN’s and reduce some work. But the point was just to show that this disaster recovery scenario is possible to achieve even though Oracle never describes the necessary steps.
The following conclusions are worth noticing:
- Non-integrated Replicat modes (like classic parallel mode in OGG 12.3) allows to simplify the recovery scenarios because the checkpoint table placed is in the user schema,
- Use a distinct table space for tables replicated by every Replicat process,
- Use a distinct checkpoint table for every Replicat process,
- Use heartbeat table to create a detailed history for every line of replication (mapping source SCN’s into target),
I am curious what is the opinion from Oracle gurus about this recovery scenario. Has anyone used it before?
I have created a dedicated thread on OTN for comments and discussions. I am waiting for your opinions.